Your Cart is Empty


Progression of a Field Grown English Elm over 6 years
Bonsai progressions are always fun to look at. It shows over a few photographs, the changes a bonsai tree has undergone over a period of time. What makes it fun though is that our art is as much about trees as it is about patience, so seeing all these changes condensed is like pressing fast forward on the remote.
Keeping records
Its a good habit to get into to take photographs of your trees as often as possible. Some basic advice; use a plain background. It is really difficult to see what's going on if you take a photo of a tree against the backdrop of other trees, a brick wall, or some other busy background. Have someone hold a sheet behind the tree, if that's all you have, its good enough. If you're interested to know what I use; I had a blinds store make up a block out blind in a standard grey material. Now I can roll it up when not in use, its wide enough for any tree I will ever have and I can drop it down to the ground and even create an infinity curve from it.
The taking of the photos is of course only 1/2 of the work, the other 1/2 is organising them. Assuming you are using your smartphone its likely any photos you take will be uploaded to cloud storage. Try to organize these images in folders which are clearly labelled.
The start

Image caption. The earliest picture I have of the elm, taken in July 2010.
This tree started out as bag stock which I purchased from a local nurseryman. The species is nothing special, I believe its an English Elm, but elms are especially great trees to field grow and to bonsai in general. They are very hardy and respond well to all the usual bonsai techniques.
I began growing it in the ground sometime before this image was taken, probably about 4 or more years as it was a very small plant when I bought it. Unfortunately I did not take photos of it right at the beginning. However I used the same methods as described in this post on field growing.

Image caption. Taken soon after it was lifted from the ground and potted for the first time in December 2012
Initial root pruning
When a tree is potted after development in the ground it has a tremendous amount of energy stored (FYI This is why older collected olives survive better than young ones). This makes it possible to do severe root pruning. This step is critical for the future of the tree. Failure to prune the roots back strong enough will mean that the thick, field grown roots will consume too much volume in the bonsai container leaving less space for feeder roots which will be needed one day to support ramification. Plus they don't look great as they are usually too thick and are generally pipe-like.
Knowing just how much can be pruned off comes down to experience but as I have already mentioned, trees grown in the field are much stronger than those which have been in a pot for some time, so you can afford to be more aggressive when root pruning.
A good root cutter really comes in handy for this work. You will notice that the cutting blades of a root cutter are considerably thicker than those of a standard branch cutter. This is to enable it to cut thick roots. This quality makes it also the ideal tool for reducing stubs of branches after they have been shortened with a saw. I have several different sizes and they are, next to my trimming scissors, the most used tools in my box.

Image caption. Updated view of the tree taken in February 2014.

Image caption. Close up detail of the wiring
In this photo you can see the result of pruning back the sacrifice branches once the branches had gained sufficient girth. They were then wired to give them some shape in both vertical and horizontal planes.
As you can see I have used aluminium wire which is the best for this sort of work as copper wire would likely damage the tender or thin bark. As a rule of thumb the wire thickness should be roughly the thickness of the branch being bent. Never attempt to take shortcuts with wiring, always do it in a deliberate and systematic manner. Failure to do so results in broken branches or ineffective wiring which does not hold the bent positions.

Image caption. Photo taken December, 2014
Almost a year after the preceding photo was taken, this photo shows the resulting development. One needs to be patient with deciduous trees when building the foundation of the branches. There are no shortcuts, you simply need to take it step by step or you may end up having to cut it all off and start again, wasting several years of development.
Branch positioning
One of the most important decisions you need to make early on in the branch positioning of a deciduous tree is the angle as it emerges from the trunk. An angle that is upwards will give the appearance of a young tree, and an angle which is downwards gives the impression of age. Postponing this decision will result in branches which look like bows (as in bow and arrow) if you decide at a stage when the branches are too difficult to bend that you want the angle to be downward. You can use techniques where you wedge-cut the branch and bend it down, but this is not always 100% successful, try to make the necessary angles while the branches are still young.
Of course as you progress up the tree this angle changes. Where it began with a downward angle it will eventually end in an almost vertical angle in the apex. Unfortunately I see too many trees where the branches are horizontal regardless of their position. This, the artist will find out makes creating volume in the canopy nigh impossible and you end up with a very stylized tree which looks anything but natural. However if that is the style you are going for then that would be the route you would follow.

Image caption. Defoliated and ready for wiring. February 2015
In this image, taken a couple months later, you can more clearly see the branch development.
I would like to make a comment on the very bottom right branch. You may have noticed a very large scar from the field growing stage in previous images. This branch was used to assist in closing this scar. It became rather thick in the year to follow and I debated long and hard about removing it. However the decision was finally made easier by the fact that the 2nd branch directly above it, would have blocked all sun and the lower branch would have become progressively weaker. One needs to keep in mind when styling your trees, that you sometimes need to think like a tree! What is sometimes possible to do in a container is not common in nature and would look odd, and therefore you need to have a very good justification for it if you keep it.

Image caption. After styling in December 2015 this is the response in February 2016
At the Cape Bonsai Kai Exhibition at Kirstenbosch in December of 2015 I worked on this tree again. I had defoliated and then wired it for the audience.
A month or so later the tree had recovered and was growing strongly once again with the wire cutting in quite deeply at some spots. In situations like this it is best to unwind the wire by hand (for thinner wire) or for thicker wire use a pliers. Wire which is not biting in should be cut off using the wire cutter toolapplicable to that thickness of wire. Don't use a scissors type wire cutter on thicker wire as you will damage the tool, no matter how much money you have spent on it.
Do not sacrifice a branch for the sake of saving a little wire.

Image caption. Wire leading to die back
Branch die back
The wire at this branch fork in the photo above has been removed but you can clearly see how that the branch which was wired has died back and the tree has decided to push energy into the other branches.
This will happen sometimes if the branch is stressed to a point by wiring, where the tree simply decides to develop other shoots instead of the one you wanted (Very arrogant I know!). So be cautious when wiring thin branches and wire them rather loosely or don't wire the thin ones at all until they gain a little more rigidity/become lignified. It may not look great but the tree is still in development after all.

Image caption. Scar treatment
This is the field scar which I referred to earlier. As you can see, it has closed up considerably and will continue to do so with repeated treatment with the Jin tool and some sealer.
In this photo you can hardly see the scar of the branch which was used to help the healing process along. In time the scar will cover over and will blend with the trunkline. I may need to shave a bit of the scar tissue with a grafting knifeand seal it again as it does seem a little pronounced for the moment. I will keep an eye on it though.

Image caption. Branch stubs
In roughly the middle of this photo you can see the stub of a branch which was shortened. The branch was allowed to develop too quickly and at the wrong angle, so before I noticed it I could no longer bend it. I have now shortened it a lot and expect a couple buds to form along its length. I will then choose two of these to develop as branches. If nothing happens, which is unlikely for an elm in the growing season, then I may simply cut it off.
Guy wires
Stubs like these can also be useful as anchors for guy wires should you need to bring a stiffer branch down. Applying thick aluminium wire does more damage than good. I don't use anything thicker than 4mm on a tree of this size and if this is not strong enough to achieve the bend I need then I will use a guy wire in addition to that.

Image caption. The nebari, often forgotten but an oh so important part of every deciduous bonsai.
Cultivating good nebari
The root spread or nebari makes or breaks a tree for me. I did my best with the knowledge I had at the time to develop the roots of this tree, but I do believe if I were to start it again I would achieve a better result the second time round.
The roots are a little too pipe-like but I believe this will "mellow" with maturity. This bonsai tree is still very young and in the years to come some of the sharp angles, rough edges and clear lines will disappear. This is another aspect about bonsai design which you need to bear in mind, your trees change over time. Sounds obvious I know, but a sharp curve which you put into a branch 10 years ago is not going to look so sharp anymore. Therefore sometimes you need to exaggerate what you do so that when you are nearer to the end product, if there is such a thing, the work which you did years ago starts to pay dividends and really looks great.

Image caption. Tree front.
Selecting a front
This is the current front of the tree, at least this is how I planted it into this container. However you should always make a point of being flexible about the front of a tree because as the tree changes the front might shift to a different position. Once you have a front it is a good idea to style your tree with that front clearly marked with some wire or whatever you have laying around. Failure to do this simple step will leave you working in a kind of circle as you will keep forgetting where the exact front is and when you are positioning the branches as the front shifts so will the ideal positions for the branches.

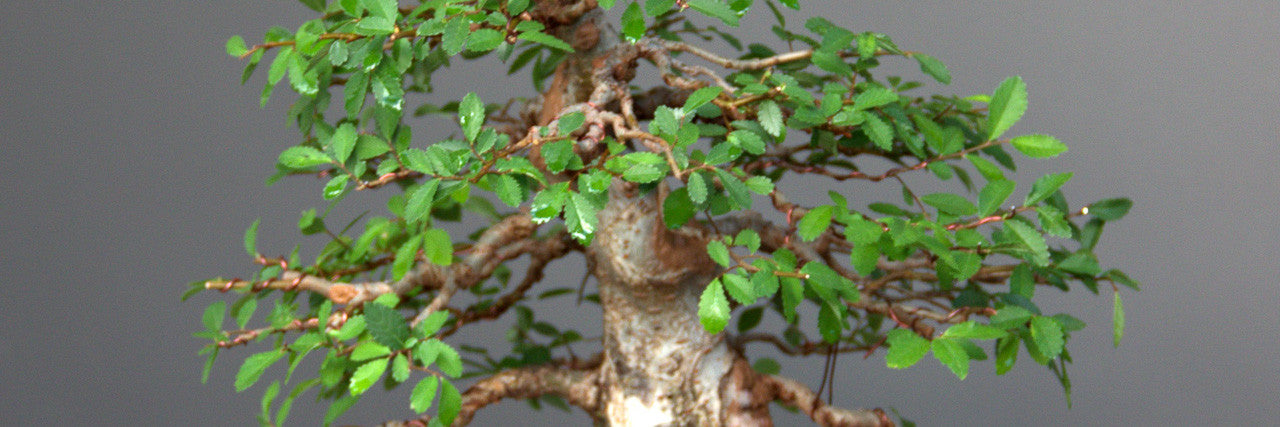
Image caption. Proposed Front
I like the movement more of this front. No doubt there is more foliage development needed, especially on the left side of the tree, in the direction of the movement. And the canopy needs to fill out with thinner twigs but I would say that the foundational branch work is just about completed. From here on it's basically going to be a process of defoliation and trimming to get the ramification to build up.
Fertilizing will play an important role now also, as the regime which worked when the tree was in the development phase will not apply now that it is moving into the next stage of development. If we feed as generously as we did back then, all the delicate branching which might have been achieved to date will be for nought as it becomes thick and coarse.
Breaking the mould
Did you spot the bar branches??? Well done, of course you did. Bar branches are not a desirable feature. Why? If your answer is that its because its a rule then that's a very superficial understanding of bonsai styling, pardon me for saying. I would suggest that the main reason its undesirable is as your eyes get caught in the crossroads and instead of following the trunkline your eyes veer off in either of the directions. Branches should {ideally} emerge at different levels for maximum visual interest. Bar branches can also lead to inverse taper which can make a tree look unstable. So why you might ask am I keeping this branch? My answer would be that you should not always be in such a rush to chop branches off when they don't fit some preconceived mould or convention.
There is a bar branch situation yes, but it's very unlikely to lead to an inverse taper issue as the trunk is rather developed, and even more importantly if I remove a branch which one do I remove? Removing either will leave a big gap. Most importantly for me; will the overall impression of the tree be improved by removing either branch?
The first branch on the left is the main branch and is the most important branch of the tree as it determines the style of the tree ie. in this case leaning trunk. The first branch of the right is opposite to my main branch and therefore is my counter-balancing branch (which still needs to develop more girth and volume) and this is the branch which provides visual stability. Removing this branch will leave the tree looking unbalanced and about to topple over, to the left.
Sometimes it's nice to have a branch or some feature which does not conform to convention, it makes the tree more memorable to the viewer as it evokes a response (outrage?) at an exhibition and it really gets under the collars of the "bonsai by numbers" folk. In my opinion if the tree is worse off with something removed then rather leave it and either remove it later or not at all.
Would you remove one of the branches, and if so which one and why? Write your comments below.
Want to see the continued progression of this tree? Continue reading here.
Check out my Youtube channel for the latest on this tree!
8 Responses


Leave a comment
Comments will be approved before showing up.

wayne
March 04, 2016
Hi Terry thanks for your reply on my questions I have studied the blog u refer to and have my questions answered I have learnt such a lot now about field growing and roots THANK you for all your excellent articles which I await each month to learn more to learn about this beautiful art form regards