Your Cart is Empty


Bend it like Brett
Brett Simon is a prolific bonsai artist and grower in the Western Cape of South Africa. He has and continues to contribute much to the local bonsai fraternity. Not deterred by convention, Brett loves to experiment with techniques and species. His enthusiasm is contagious and I am certain you are going enjoy his first blog and video here on Tree Talk.
Timing of bends like this
The best time of year to perform a bend like this is late winter - early spring just before the tree starts to grow. The reason for this is that the sap flow is low. With heavy sap flow the cambium can separate very easily from the heartwood. To check if you are still within this window you can scratch the cambium, if it is difficult to scratch off the heartwood you are still fine. If the cambium comes away easily it is too late.
The second reason is that once this has been performed the movement of resources through the tree help speed up the recovery of the bend you have made. Small tears etc heal very quickly during this phase.
The thickness of the branch/trunk should be as thick as your thumb or thicker. Anything smaller can be bent using normal wiring methods.

Image caption. Urban yamadori collected by Brett Simon, before any styling.
How to prepare the section to be bent
First you need to clean all loose bark off of this section. This will allow you to see what is below. It will also uncover any flaws or dead areas below the bark. Decide in which direction you want to make your bend. Check on the inside of the direction of the bend. Make sure that you have nothing stopping you from bending in the direction you wish to go, branches, jin's etc.
Secondly make sure you have everything you need to make sure the bend will stay where you want it. Guy wire may be needed to hold the branch/trunk in place.
Removing any deadwood present
If there are any areas of deadwood in the section you wish to bend ,all the deadwood must be removed. The deadwood has no flexibility and when you try bending it, it will just snap. By removing this you lessen the chance of the branch breaking. The amount of wood to be removed should not exceed 50% of the total diameter. Make sure the living vein is still present on the part you wish to leave.

Image caption. Brett prefers using a root cutter to a branch splitter when removing deadwood which is in the way.
Wiring it up
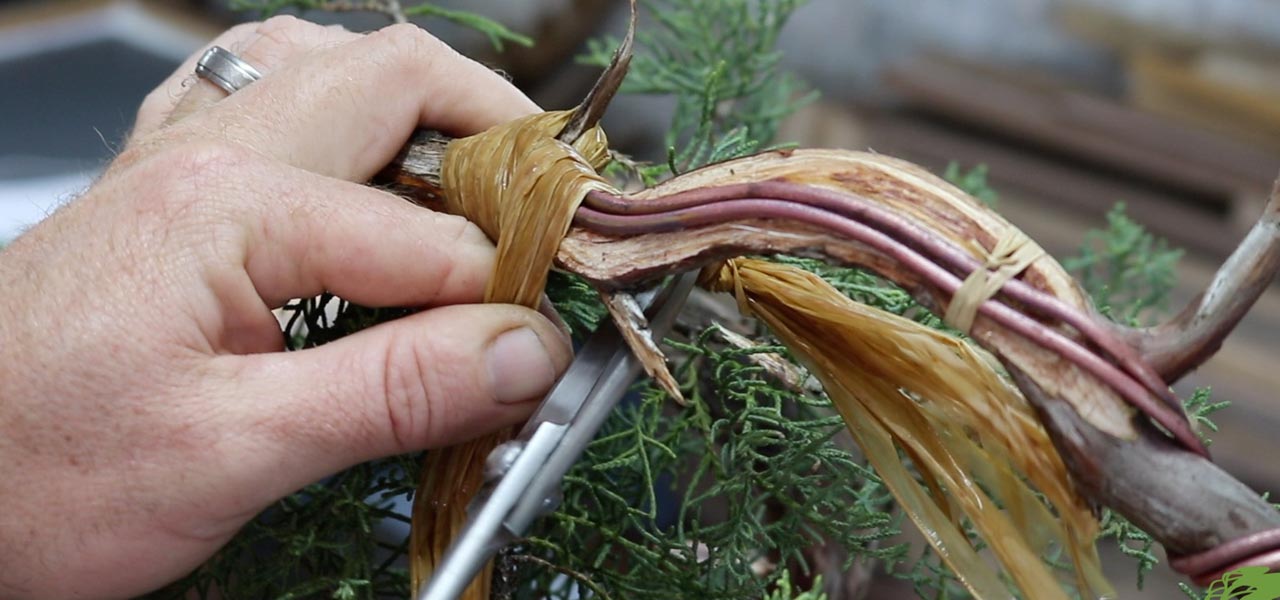
Copper wire is preferred as the spine as it work hardens. This means when you bend the wire it actually becomes stiff. The wire now acts as the backbone. When bending wire it bends in a uniform arc. This helps the sudden bending in one spot. Make sure that the wire is in contact with the wood at all times. If there are gaps the wire is not functioning properly. Roll the wire onto the wood. This helps it bend to the shape of the wood. Loosely tie it into place with small strips of dry raffia.

Image caption. Secure your copper wire in position using a piece of dry raffia.
Applying raffia
Raffia in my opinion is the best binding material out there. It is breathable, meaning that the area under the raffia can still exchange gasses. It has stretch and is extremely strong. It also shrinks when it dries. This makes the wrapping very tight. There are other material out there but they always seem to be able to stretch more, meaning even when you pull tight they can still stretch further. They also don’t shrink slightly when going from wet to dry. Raffia also looks good. If you are doing a bend like this it is going to be on the tree for up to two years. During this time the tree can still look good. A plastic/ silicone tape does not function as well and looks ugly in my opinion.

Image caption. When wrapping with raffia make sure you do it as tight as possible.
The amount of strands that you need should equal the thickness of the branch to be bent when laid flat. Make sure all the strands are free by pulling your fingers through it. Roll this round your hand to make a coil. Put this into a bucket of water. Make sure that it is soaked completely. Easy way to tell is that the fibers go from a solid colour to almost translucent. Unroll the coil and again make sure all the strands are free from each other. The aim is to make sure that the strands stay flat and do not bunch up. Refer to the video for this.

Image caption. A tip to remember. Raffia is ready for use when you have soaked it long enough to be able to see your finger through a fiber.
Making the bend
When bending the aim is to do the bend in one go. The reason for this is that the more you bend back and forth the more damage you are doing to the branch/trunk.

Image caption. Get a feel for the bend by checking what the breaking point is on a disposable piece of branch.
Bend slowly and always use your hand as the fulcrum. This is the point where the bend is being made. While bending check on the outside curve that the cambium is not tearing. As the branch trunk is covered in raffia you need to listen for cracks and pops. Small tears will heal over quickly. If you hear tearing or pops move your fulcrum (bending point) over slightly. Use a guy wire to hold in place should you need. Remember going slightly further than you need and releasing a bit of the tension will also help with the bend.

Image caption. Slow and precise movements are required for making the bend.

Image caption. You may need to employ the use of a guy wire to ensure the bend does not open at all later.
Aftercare of the tree
After a bend like this I place the tree back outside where it was before the bend. There is no need to place in the shade etc. Once the tree starts to grow I will feed as normal. The more growth that you get above the point of the bend the faster the bend will set. Therefore I feed heavily and let the tree grow freely. Hopefully by the end of the growing season the bend would have set. If not then during autumn when the tree puts on girth the bend should set.
Conclusion
Bends like these can transform a tree. Although they seem difficult they are easy to perform and all artists should know how to do this. You can practice on a branch that you know you are going to remove.

Image caption. What a difference the bend has made to the future styling possibilities of this juniper!
Please note that a wedge cut should never be performed on a juniper. The reason for this is that the vein of the juniper is linear. When they are young they are able to move resources up, down, left and right. As they get older they stop being able to move the resources left and right and are only able to move up and down. I will try go into detail about this in a future post. The problem is that there is no way to tell when this left to right movement is stopped. So if you wedge cut you maybe removing the only tissue that is moving up and down. The juniper may not be able to move around where the wedge cut is made. This will equal a dead branch.
Please note that this technique is Juniper specific.
Leave a comment
Comments will be approved before showing up.
