Your Cart is Empty


Swamp Cypress Bonsai Styling
Background
A customer asked me to style this swamp cypress which was part of his collection.
I thought I would video and also write about the process I followed to style the tree. The intention and hope is that this might help you to formulate an approach when you have just added a tree to your collection and wish to work on it.

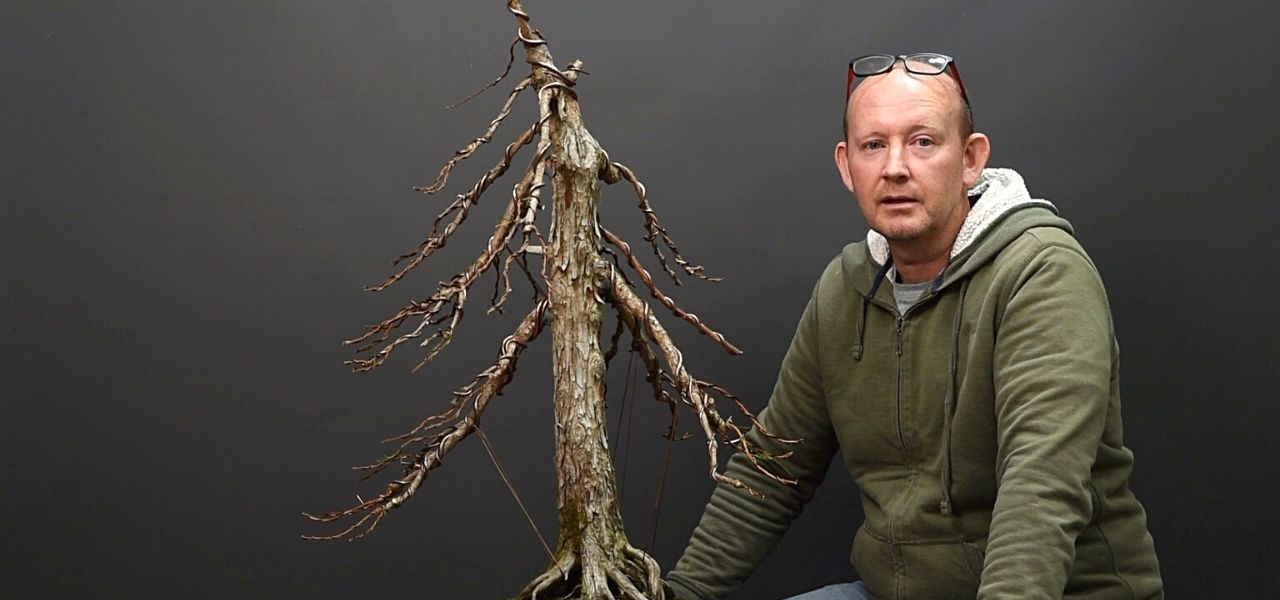
The tree before commencing any work
Assessment
I would advise strongly against just sitting down in front of a new tree and beginning to chop off branches, however tempting it might be to do so. After bringing the tree back to my place it was with me for about 2 weeks, with me passing it every day and giving it the once over each time. Finally, I was ready to work on it. This time allowed me to have some idea of what I wanted to do with the tree before starting to work on it.
Here are some of the questions I asked myself when studying the tree:
the roots
- Are there any weird contorted roots which don't suit the rest of the tree, or which demand immediate attention when viewing the tree?
- Are the roots one-sided ie. all emerging from one side of the tree?
- Can you see the roots or are they buried - can you remove some soil to expose them a little more?
- Do the roots need to be improved through grafting or even ground or air layering?
the trunk
- Which angle presents the trunk best? Does tilting it backwards, forwards and or rotate it look better?
- Does it have any scars which you do not want to be visible? If it does can you make it a feature of the tree in the future?
- Does the trunk have taper and if not can it be rotated for better visual taper? Would cutting it shorter enhance the taper by bending a branch up, making it the new trunkline?
- Is there movement in the trunk, do you want or need more? Can you rotate the trunk to improve the movement?
the branches
- Where are your branches situated angled in relation to the viewer (and potential front of the tree)? What is the best compromise between finding the best solution for the preceding considerations and finding the best angle to display the available branches?
- Do you have multiple branches originating from the same position along the trunk which you need eliminate to prevent swelling at this point (assuming it hasn't already started)?
- Are there branches directly above and close to one another which could cause weakening of the bottom branch?
- Do you have handlebar branches which need attention. This refers to branches which are directly opposite one another on the trunk, allowing such branches to remain can result in reverse taper but depending on how prominent they are can create a cantilever look on your tree.
- Would grafting branches to the tree be an improvement?

Branches vertically above/below one another in near proximity and of equal girth are less than ideal
The above are only some of the considerations which go through my head when sitting down in front of a tree which needs to be styled. The questions will differ depending on the species, the style and also very much on the stage of development the tree is in.

When making decisions on the above some might need to be taken immediately and some can be postponed. For instance if you already have a grouping of branches causing a reverse taper problem then it would be prudent to remove one or more of the branches immediately. However in the same situation but where the reverse taper is not visible yet perhaps the branches can remain to serve one or other purpose such as healing a scar lower down the trunk.

Sometimes its best to remove excess growth before it begins to create problems. Knowing when to cut and when not to is a skill developed by experience and understanding the result of actions taken.
My strategy for this tree
For most of you, when determining your strategy for a tree you can do so without considering another party. In my case this is not my tree. I need to consider what my customers' expectation might be with regards to the styling. For instance I cannot simply decide I want to chop off all the lower branches and keep those in the apex. Sure, sometimes such styling happens in consultation with the customer but as I mentioned for most of you, your considerations will be what you and you alone are striving towards.
In determining my stylistic approach to this tree I went with something fairly orthodox however based on my idealization of these trees in their natural form. As you will see from the work once completed, there is much room for improvement. However one can only work with what there is available at the time, with a view of how it can be improved in the future and the strategy you will apply in order to attain it.
Structural branch work
As this tree is very much still in a development phase my focus is mainly on positioning the structural branches, forming the skeleton of the tree on which to later place the "meat." Of course secondary branches, where there are, will be used to begin formation of ramification though.
From experience I can tell you that wiring and bending a swamp cypress branch is not a long term solution. When the wire is removed the branch will simply spring back to almost its original position. The only reliable method of bending these branches is to cut wedge and bend the branch down. The branch heals in this position and will remain set once wire is removed.

Good wedge cuts require a little practice. Fortunately swamp cypress are relatively forgiving being such strong growers.
When cutting the wedge do so with a sharp, fine toothed saw for the best result. Try ensure that when bent the two halves meet cleanly. For some species this is critical but with swamps, as they are such strong growers its actually a good species to learn this technique on as they tend to be more forgiving. You can choose to use wire only or wire with a guy wire anchored elsewhere on the tree.

Guy wires worked best for me on this tree
Wiring
Choice of wire
For this tree I used aluminum wire in various thicknesses. I personally do not prefer to use very thick aluminum if I can avoid it as I feel that it can easily crush the plant tissue as you apply it to the branches.
Procedure

One always starts at the base of the tree, working up into the apex. I prefer to wire a branch and then set it into the position I want, adding any curves to the portions being bent as I go along. And don't forget to add curves in a 3D manner, I see FAR too many trees wired so branches look great - for a bird - but when viewed from the front they appear perfectly flat.
Wiring for volume

To create volume to your foliage pads you need to wire accordingly. The concept is a little challenging to describe in words, bonsai is after all not a theoretical pursuit, however in principle using side and top branches, try to create volume to your pads so that all branches do not lie on the same plane. It is possible to use bottom branches to, however bear in mind that they can weaken over time as they are usually shaded out by branches above them, I generally tend to eliminate bottom branches.
Branch angles

I often see secondary branches on bonsai which have been wired into very unnatural positions, for instance at angles of 90deg and greater to the structural branch. Please do yourself a favor and go study trees in nature; this seldom happens. Such branches tend to have a much more acute angle, and appear much more fluid as opposed to having jarring changes of direction. In this tree, in many places, I closed the angles quite considerably and you will find that when you do this, it will just look right.
Position of wire

There is a simple RULE, yes I said it, I swore - sorry. If I want to bend a branch down I wire over the branch, if I want to lift it I wire under the branch. This supports the bend when I apply the force to the wire to change the branch position. Break this rule and break your branch, or at least risk breaking it.
Anchoring wire

Should you need to remove any branches you might consider using them as anchor points for your wiring. Sometimes such jin's already exist and can be used immediately.
For some video tips on basic wiring please read this article.
Sealing cuts

It is important that you seal any cuts you make. I prefer to use sealers developed for use on plants. Plant sealers often have disinfecting properties and even hormones to assist with callous formation.
It is advisable, when you make large cuts with a branch cutter or similar tool, its a good idea to neatly trim the edges with a grafting knife or blade of some sorts. This will accelerate healing of the area and reduce the risk of infection.
On the wedge cuts which I made on most of the branches, I used the putty types of sealers. On smaller branch cuts I used the Top Jin paste applying the sealer with a small brush.
The apex

For now there is no real apex. The termination of the tree felt a little too abrupt to me so for now I have trained a fairly thick branch into the position on which a future apex can be built. This branch has been left uncut and should remain so, acting like an escape or sacrifice branch. The more sapflow into this the more the region will thicken and at the same time it will assist healing over the cuts which I made.
When this branch has done its job it will be dramatically shortened and side branches will be encouraged and ramification can be developed in this region.
Natural VS Stylized
There is a debate which has been raging on for some time now and will most likely continue for many years to come. Not that I profess to have been enlightened myself yet, but it seems at the very least that it is the "in" thing to claim to be styling in a natural way rather than I guess unnatural (seeing as this is the opposite to natural). In my view, without delving into the debate too much, and neither do I wish to oversimplify it, no bonsai are natural, they are all artificially created. I will admit that some trees do appear more random or chaotic than others which appear highly stylized or perfect. For me there is room for all in the bonsai world. One is not better than the other, the beauty is always in the eye of the beholder. (Have you ever taken a peak at the greater art world???) *

I took this photograph of a very young swamp cypress just outside Stellenbosch. Take particular note of the angle of the branches.

I took this photograph of a group of swamp cypress, also outside of Stellenbosch. These trees are a little older but still project an image of young trees.

Some examples of older swamp cypress, taken off the internet. The downward branch angles depict older more mature specimens, and it is this image which I prefer.
So to reel in the debate to the tree in discussion, this swamp cypress. There are some examples of this species which have been styled very differently to what I perceive as the norm, and these have been dubbed at least by some as being very natural - thus perhaps by default claiming others as fakes. I can style my swamp cypress like a baobab tree if I wanted to (which I do not) or perhaps more accurately if my customer wanted me to. However I like to believe I took inspiration from nature for this styling and did consider how the species grows where I live and indeed other parts of the world too. My goal is not to reproduce precisely what nature has created, although beautiful, sometimes this is not possible for horticultural reasons or others. Usually designs will be to a lesser or greater degree a stylized version of the natural tree form.
Concluding remarks

I have made a number of comments in the video which I hope you will watch, like and share (and do subscribe to my channel for when I do more like them). However in brief, the tree offered me certain opportunities for styling. I know this species to be a very strong growers and over time new opportunities will be presented.
You can rest assured that whenever I am asked to work on this tree, it will be done with a view of improving it - which may or may not mean I will remove certain major structural branches in favor of branches deemed to be better positioned. Some of the branches are also a little long and might be shortened when the tree has had a chance to respond to this styling.
There are certain areas of the design which are a little empty but I am confident we can fill those up in a relatively short space of time. Given that these trees are such strong growers it will be a tree which will have to be watched quite carefully if wire bite is to be avoided.
To build and maintain ramification will also present a challenge to the owner if the balance between health, fertilization and watering is not good (Lots of fertilizer + lots of water = lots of coarse growth) however I hope to post again about this tree in subsequent blogs and videos so you too can watch its progression, so be sure to subscribe to my newsletters so you don't miss this.
* One should always strive for creativity. If every tree in your collection looks the same then I would encourage you to experiment and break from your comfort zone a bit, the results might surprise you and you might feel revitalized by your new-found artistic freedom.
Leave a comment
Comments will be approved before showing up.
