Your Cart is Empty


Approach Grafting on a Japanese Maple
Approach grafting is one of several grafting methods available to bonsai growers. It differs from thread grafting in that a hole is not drilled through the trunk, through which the scion is passed. (By the way, the scion is the branch you are using to graft with.) In approach grafting a groove is made in the stock or plant you are grafting onto, and the scion is placed into that groove. As the groove in the stock heals, the cambium of the scion and stock fuse and eventually the parent branch can be severed.
Why approach grafting?
This form of grafting can be useful for the following reasons, and perhaps there are more:
- Sometimes you need a branch where there is none to create volume to the tree, or perhaps if you need a branch low down on the tree and no bud wants to form there.
- If you want to thicken a section of a trunk then graft a sacrifice branch above that area and allow it to grow. Everything below it will thicken and eventually you can remove the branch.
- When you make a large cut, you can use grafts to assist closing this scar quicker by grafting across it.
- I have used this technique very successfully to create a new apex by approach grafting a branch in a very vertical fashion onto the existing trunk, eventually reducing the trunk to the graft and thereby achieving good taper and change of direction - which gives more visual interest.
- If you want to entirely change the foliage type of a tree you can use individual trees of a more desirable foliage and graft branches onto the parent tree, eventually removing all its natural foliage.
- Approach grafting is especially useful for improving nebari. Rooted cuttings or 2 - 3 year old seedlings can be used for this, however this procedure can of course only be done during repotting.
One of the advantages of approach grafting over thread grafts is that the latter can only be done in early spring when the buds are beginning to swell. Approach grafting can be performed on any healthy tree any time during the active growing season however the peak growing times such as mid spring till early summer is probably the best.
Tools you need for the job
For this work you will need:
- a suitable healthy tree with many long whip-like branches. An easy way to know whether a tree will easily take to this technique is to consider how long it takes for a scar to heal. If scars heal quickly on the species you want to graft with then it will probably graft easily. If on the other hand scars take forever to heal then it's going to be difficult and at the very least will take a lot longer.
- trimming scissors to remove the leaves.
- fine toothed saw to make your grooves
- grafting knife to recut the above groove to ensure it is cut cleanly.
- marker pen to mark out where you are going to graft.
- pins or nails with some form of padding such as squares cut from a rubber tyre inner tube
- panel hammer
- wound sealant to seal the graft afterwards
- Aluminium bonsai wire to secure and/or to direct or shape the graft.
It's also easier to perform this work on a dry tree, in other words do not water it that day. This will make defoliating it easier if you are going to defoliate, if not then it does not really matter. It is not a prerequisite to defoliate however it does make working on the tree easier as you can see better and leaves won't be getting in your way.
Preparations
Before starting you can go ahead and defoliate the entire tree if the growth is too dense to see what you are doing, however leave the growing tips, do not pinch or cut them at all. You want them to continue extending so the scion will thicken and fuse that much quicker with the stock tree. Now that all the leaves are out of the way study the tree and decide where you need branches to fill in some gaps. If on the other hand it was not necessary to defoliate then you can leave the tree with all the leaves on so that the tree does not expend any energy on putting out new leaves and directs this energy instead into healing the grafts.
Marking out the positions for the grafts
Ideally the positions for the grafts should result in the branches being on the outside of curves. Don't pick positions vertically below one another which are also close together. You need to remember that you are interrupting the sap flow with each groove you make, and if not done sensibly you could have sections of your tree dying off as you have interrupted the sap flow too much.
Using your marker pen, mark the positions where you want to place a branches. Doing this now helps you to find the spots you selected once you begin the grafting work, as the tree quickly becomes cluttered with branches criss-crossing all over. Select a suitable branch to use as your scion. What you are looking for is a branch which can firstly be brought into the chosen position, and you want to choose a section of the branch with the shortest internodal distances. The internodal distances are very important as you want to have many internodes close to the trunk so you can get branch ramification up close or simply to change the angle after the graft has taken by cutting back to a suitable bud.
Once you've selected your branch test that it can bend into position. It's easiest to start working from the bottom of the tree and work up to the top, just as in wiring.
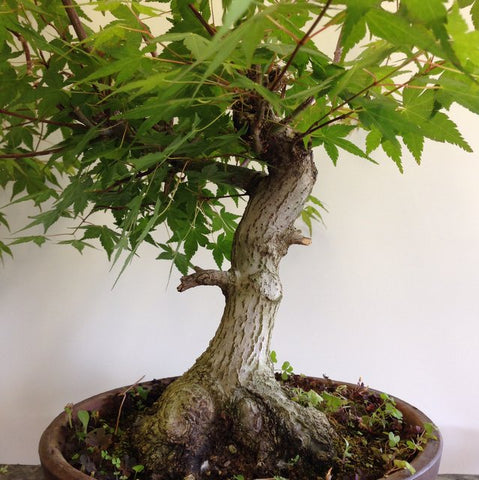
Image caption. Here is our stock tree, the one we will be grafting with. As you can see it has great roots (nebari) but not much else going for it. This is great material for thread grafting as the stock tree is healthy and has many long whips which we can use.
Consider the angle at which you want the grafted branch - never pick horizontal, angled either up or down is best and will depend on the style you are going for in the tree. Leave the branch for the moment but remember which one it is.
Making the cuts
Make your first cut with the fine toothed saw, at the angle you just determined. The depth of the cut should be such that the scion will be just below the surrounding tissue. This is to ensure that when the cambium of the stock tree starts to heal over, it does not simply pop the scion out of place. You can now use a wider saw blade to increase the width of the cut, alternatively you can use a grafting knife. The width of the cut should be just wider than the thickness of the scion. It's a good idea to test the fit every so often. You don't accidentally want make the cut too deep or too wide. Once the fit is nice and snug, you want to finish the cut off with a grafting knife.
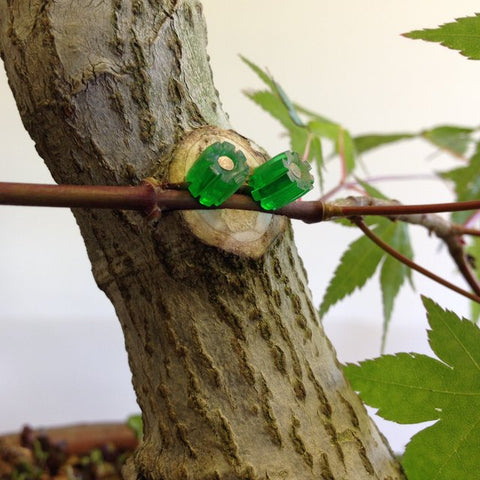
Image caption. Closeup showing the scion in a groove prepared for it. Note that the scion rests slightly lower than the surrounding tissue. The pins with their cushioning apply firm pressure but do not squash the scion.
In general when making any cuts in bonsai it's always a good idea to finish off the edge with a blade as this accelerates the healing process.
Securing the scions in place
Have your pins, padding and panel hammer ready as you are going to need it for the next step. Bring the scion around and place into the groove you've just made. Try to position the scion such that an outward facing bud is close to where the scion emerges from the groove as this might be useful in the design of your tree. It's not necessary to scrape off any bark on the scion, the surfaces will fuse eventually and scraping too much cambium off will weaken the scion and possibly kill it. However if you are a little more experienced you can scrape some of the cambium off because if you can manage to get the cambiums of the scion and stock to meet, the graft union will take place that much quicker.

Image caption. As its best to leave the grafts entirely undisturbed until they have clearly fused, to give a branch some curves it's best done now using some aluminium wire.
You may however also need to remove any buds which force the scion away from the back of the groove, do this with a sharp blade or grafting knife of course. Place one of the pins between the scion and the upper side and end of the groove. Push the pin into the wood so that it stays in position. You can now gently hammer it the rest of the way in, till the scion is slightly compressed in the groove by the padding you used. If you have a willing assistant around they can help you with this step. Now place another pin on the lower side and opposite end of the groove. Hammer this pin in also.
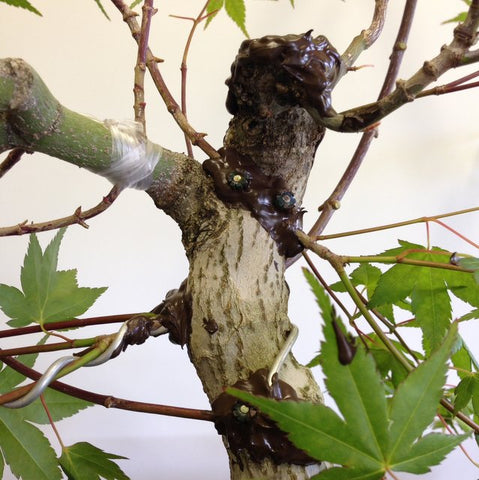
Image caption. Congratulations you have now completed your first approach graft! Carry on in this fashion, up into the apex of the tree until you have completed all the grafts.
Using wire to give interest
You can apply some wire to the scions now if you'd like to give the branches some shape. It's wise to do this now as it will be some time before you can safely wire the branches once the scion is separated from the stock tree. By then the branch would have thickened and perhaps then impossible to bend.
Sealing the grafts
After you have wired the branches you need to seal the grafts very well. You do not want any air penetrating the seal as this will result in the graft union either failing altogether as the live tissue dried out, or taking much longer.
Treat the tree as normal. Fertilize as you normally would also. BonsaiBoost is what I would recommend but any organic fertilizer of your preference should suffice.
When to cut the graft
A successful graft is quite easy to spot. It should be quite obvious that the scion and stock tree have fused where they meet at the graft union, as there would be visible swelling. You should also see that where the scion emerges from the groove it will be thicker than where it entered. This all normally takes anything from 6 - 12 months. At this time you can now cut the scion on the entry side. It's best to leave a short stub so the scion can naturally dieback to the trunk. If the graft union didn't take place successfully by 12 months you may need to redo it
Summary
And that's all there is to it! Initially it might sound like an intimidating technique best left to the professionals but this is simply not true. I'm confident that in no time you will find all sorts of excuses to graft on all your trees and they will only benefit from the added foliage volume.
Follow-up
A year later the grafts were all successful and could be cut. There are many more styling options available for this tree now.

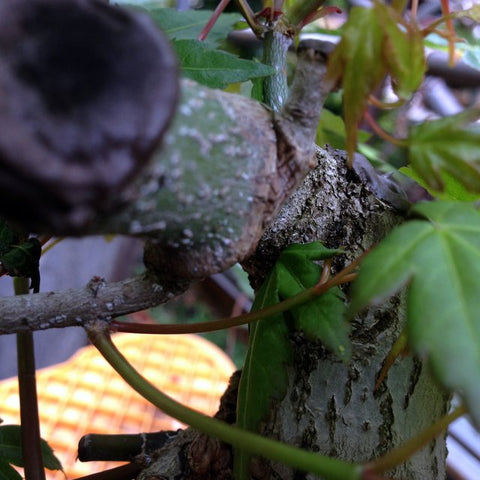
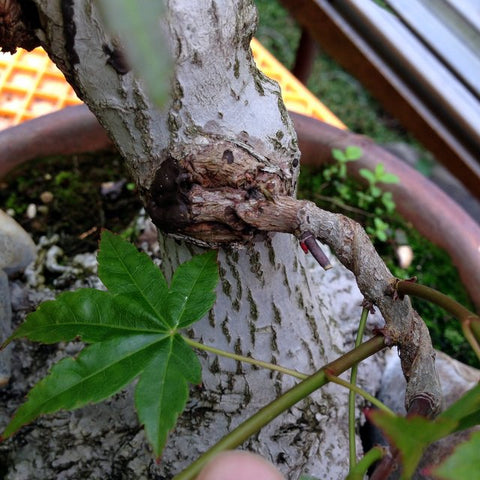
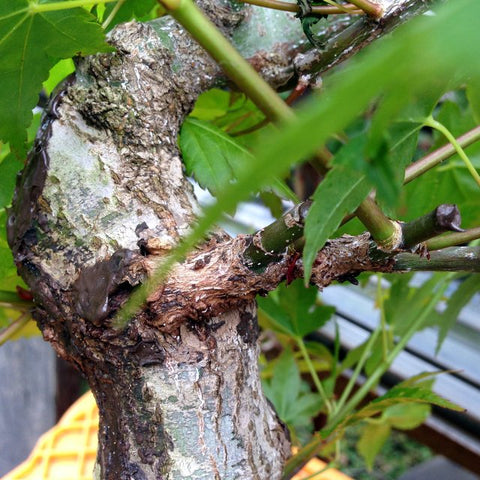
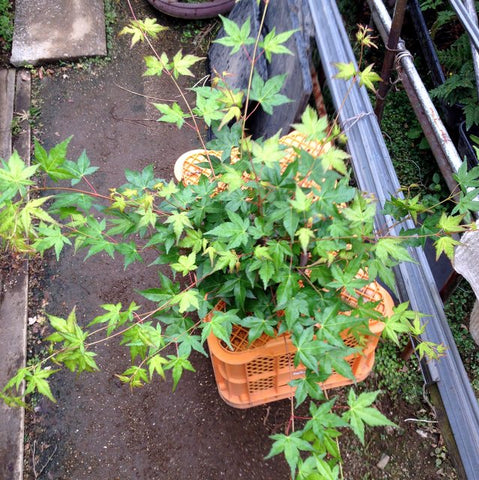
Image caption. As you can see the tree is healthy and the branches have been allowed to develop and thereby heal quicker in the grafted areas.
6 Responses


Leave a comment
Comments will be approved before showing up.

Terry
January 04, 2016
Thanks Bill for your support! Much appreciated.