Your Cart is Empty


Ground Layering of a Trident Maple with ugly roots
Layering, according to Wikipedia is "a means of plant propagation in which a portion of an aerial stem grows roots while still attached to the parent plant and then detaches as an independent plant." This is a very good description of what layering is all about in my opinion.
Layering is a very useful technique whereby good starter stock can be obtained from an interesting branch of an ordinary garden tree or perhaps a portion of an existing bonsai which has the potential to be turned into a bonsai itself. One of the great 'cheats' about layering is that you start off with a thick trunk already so it's much faster than a cutting. Another great thing about layering is that if done successfully, all the roots emerge at the same level which gives you a great start towards developing wonderful nebari.

Image caption. Trident maple which has been layered. To create nebari (surface roots) like this, layering is the best method to achieve it.
Why layering?
Peter Tea taught me that with any technique in bonsai one should ask three questions.
- What: referring to what technique is appropriate for achieving the goal you are going for;
- When: meaning what time of the year or in relation to something the tree is doing; and finally
- How: this is pretty self explanatory I think.
So let's start with the....
What?
As this newsletter is about layering it's obvious that we have elected this as the technique to be used already. However let me share with you the process of how I determined that layering was appropriate for the tree I am using as an example.
The trident maple was obtained from a friend. I liked the tree but it had an ugly nebari (roots). In order to fix this we can use grafting or layering. Grafting could work however it will take several seasons before achieving a satisfactory result. Layering on the other hand, if successful is very quick and would have the added advantage of reducing the overall height of the tree and thus make the trunk appear more powerful. I chose to layer.

Image caption. This tree has a very bad surface root area, or nebari. The best and quickest way to resolve this will be to layer it.
When to layer?
When is an interesting question as I hate to refer to months of the year and what the bonsai grower should be doing. I think it is more accurate to look at what the tree is or isn't doing and decide based on this what's possible.
We do not want to layer in winter as nothing is happening, no sap is flowing so there would be no reason for the tree to push out new roots. Autumn is also not a good time as the tree is slowing down, plus in very cold parts of the country I think the roots might be damaged by the low temperatures. Summer is generally too hot to start a layering and also there is too short of a growing period for the new roots to develop before winter dormancy sets in. So this leaves us with spring.
Spring is when energy levels in the tree are very high. I think this is the best time to start a layering, once the spring leaves have emerged and hardened, and sap is flowing strongly.

Image caption. When your tree looks like the above, that's an indication that its a good time to try a layering on it. New spring leaves should have emerged but not yet hardened.
How to layer?
So as usual, it's best to get all the tools you will need to complete the job together and at hand for when you need them. I have listed the items I would normally use but your list might differ slightly depending on the type of layering and perhaps species you are working on.
- Rooting medium; which refers to the medium you will use to fill the container, bag or whatever you will be using to promote root growth in. It should be fast draining, without too much organic material in it although some organic helps with water retention. You might also consider using vermiculite. Something you should also consider is that when you separate your layering from the parent plant, the roots are going to be fairly fragile. If you use a medium such as long fibre'd green spaghnum moss or similar, when you are working with the layering some roots might be broken off with the movement. I find that using a medium which easily falls away is least risky.
- Rooting hormone; there are several kinds. It needs to be the formula for hardwood cuttings, if using a powder.
- Earbuds are useful to apply the hormone powder or you can use a brush.
- Plastic bag/sheet, plastic plant pot cut in half or plastic drainage mesh in which to root your layering.
- Sharp, clean carpet knife or blade, or a grafting knife.
- Marking pen, chalk or pencil.
Get your tree onto a nice clean and solid workspace. If you are layering a branch on a tree outdoors then it's handy to have all the things you need on a small table or something close by. Determine where you want roots to emerge and make a nice, visible line all around the trunk or branch. With the layering I'm demonstrating I will remove a band of cambium completely because if I don't the tree will simply heal over rather than issue new roots. I would say the same approach should be applied to any strong, deciduous species.
Make another line roughly parallel with the first, lower down on the branch or trunk. The distance between the lines is roughly equal to the thickness of the trunk/branch. This is important because if it's too narrow then the tree might just heal over.
Carefully cut deeply into the bark right round, for both lines using your grafting knife.
Tip! As sap will be flowing strongly now once you've made the 2 horizontal cuts, make a 3rd cut vertically. You should now almost effortlessly be able to peel the bark off.
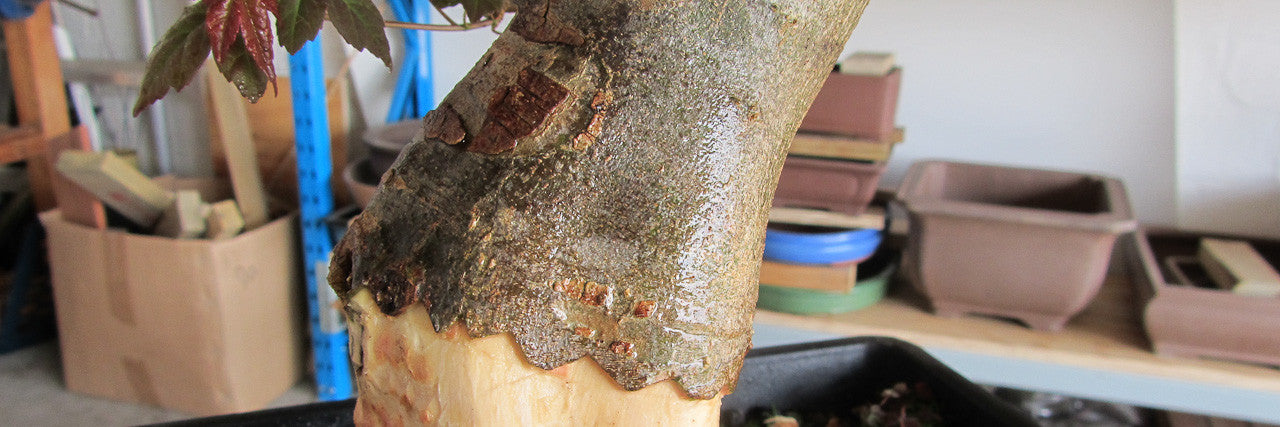
Remove the bark between the two lines. Be sure to scrape off all the live tissue or cambium (the layer of green) until you reveal the wood beneath. You can now apply your rooting hormone to the upper cut, but I like to add a serrated edge to the top line of my layers. I believe it increases the length of the living edge and therefore the chance of roots. It also means that all roots don't come out at the exact same height, there will be a small variation on heights between them. Go back and clean up any cuts which you made which were not 'clean.' It's very important that a sharp blade or preferably grafting knife be used, and very precise cuts are made or you crush the living tissue and roots will not be produced.

Image caption. A zig zag cut extends the surface of the cambium or live tissue which in turn increases the likelihood of root production.
Using a dampened earbud or brush, dip it into your rooting hormone powder and apply it to the top cut. Be quite generous with this so that the cambium is completely covered with hormone powder.
As my layering is low down on the trunk I will now create a containment area for my growing medium using drainage mesh. Keep the sheet together with cable ties or wire ties. Fill with rooting medium until the layering is completely covered. It's best if the medium is not bone dry because you don't really want to water now or you might wash away much of the rooting hormone you applied. Better to water the following day. Although I believe the serrated edge also retains the powder better.

Image caption. Use a piece of plastic mesh to retain a fast draining growing medium such as my Professional growing medium containing stone, peat and LECA.
Aftercare
Keep the tree in a lightly shaded area. This will reduce the speed at which your rooting medium dries out. You can also cover the surface of the medium with mulch to slow it down further, if you find you are unable to water frequently enough. The idea is to keep it from getting dry as this will kill any roots. You also don't want to keep it wet as then you will likely only get a couple really strong roots.
It's not advisable to keep checking all the time for new roots but you can check every now and then by gently brushing away some of the growing medium. If you see some roots well done! If not be patient a little while longer. If by around summer you still don't see anything happening then it's fairly safe to say nothing is going to happen.

Image caption. Root development after one growing season. Typical for fast growing species like the Chinese maple.
Separating the layered tree
After a full season has passed, you have passed through winter, and the tree is showing signs of spring with buds swelling then it's a good idea to separate the layered tree from the parent. To do this you will need a fine toothed saw. Remove the drainage mesh retainer and gently clear away as much of the medium as possible to expose the trunk. Lift the roots out of the way so that you can get to the trunk with your saw. Make a clean cut through the trunk as close to the new roots as possible, trying as best as you can not to damage them. It's important to make this cut very close to the roots or the stub will be a waste of space in the pot. You can also use a root cutter afterwards to reduce the stub further if you wish.

Image caption. Use a sharp, pull saw such as the larger toothed one made by Japanese company ARS, to separate the layer from the mother or donor plant.
Spread the roots out in all directions, in your prepared pot and secure the tree with wire. You might want to pot it initially into a plastic container instead of a ceramic pot, and I have several options available to choose from.

Image caption. You may also like to place something below the roots to ensure they are as horizontal as possible which enhances the trunk flare. Here is a blog post dealing with that subject and in fact using this same tree.
Protect the tree from wind as you would any newly repotted tree. You can lightly begin to fertilize in a few weeks and also move the tree to a more sunnier position.
There are many variations of layering, I've just demonstrated one. It might be safer with trees which do not readily issue new roots to instead of ring barking it, create flaps of bark, inserting a pebble or something underneath or just removing sections of bark rather than a full ring. If you are unable to create a small containment area like I did, if your layering is higher up in a tree or on a branch, then you can use plastic sheeting or even a normal plastic pot cut in half. Whatever you use it's extremely important that it should not be able to move. Any movement will break any new roots off.
I hope you have enjoyed this newsletter and that it has inspired you to do your own. Although this is definitely the wrong time of the year to start a layering you can begin looking at trees in the garden or bonsai trees in your collection from which you can get an additional tree through layering or where the tree's roots might be improved through layering.

Image caption. Roots which resulted from applying the above techniques. They will now thicken over several growing seasons.
8 Responses


Leave a comment
Comments will be approved before showing up.

Bent Høitomt
March 18, 2017
Thank you very much for chearing all your valuable knowledge Terry. Your thoroughly documented techniques and processes are amazing and very inspiering. Greatings from up north in Norway.