Your Cart is Empty


How to build a wooden box for an elm bonsai in 1min 42sec, well almost.
I'd like to share with you how I make a simple wooden box to temporarily grow field grown or collected trees.
Of course to make it a little more interesting I will also put a tree into the wooden box! The tree I will be working with is a field grown cork bark elm which I bought from Stephen at Stone Lantern Bonsai in Cape Town. It was the opening day of his new nursery in the Joostenberg area, and this coincided with his annual release of new field grown stock. As I have heard so much about these events from others I decided this year to go along and see for myself what all the fuss was about, and I was very happy that I did.
Elms are probably one of the best species to grow as bonsai as they are very hardy and respond well to bonsai techniques. Although I made a decision some time back to focus on pines and Chinese maples, I guess I have been to one too many of Freddie Bisschoff's talks on elms {and seeing what he has done with stock from Stephen) so could not resist the temptation upon seeing all the wonderful trunks which Stephen had grown.
My purchased tree

Image caption. The field grown tree I selected from Stone Lantern's newly released stock
I like powerful trees and so it is no surprise this elm caught my attention. It is a classical 'informal' upright tree with nice movement and taper. The roots were evenly distributed around the trunk and due to the cork bark of this species, any scars which were there are now no longer visible.
And no, I am not endorsing the consumption of Coca-cola, it's there just for scale.
Study of the roots
As Stephen had only recently uprooted these trees and placed them in pots I believed it would be safe to lift the tree again and see if I wanted to make any changes to the roots. So I removed the soil it had been planted into and washed off the root system.

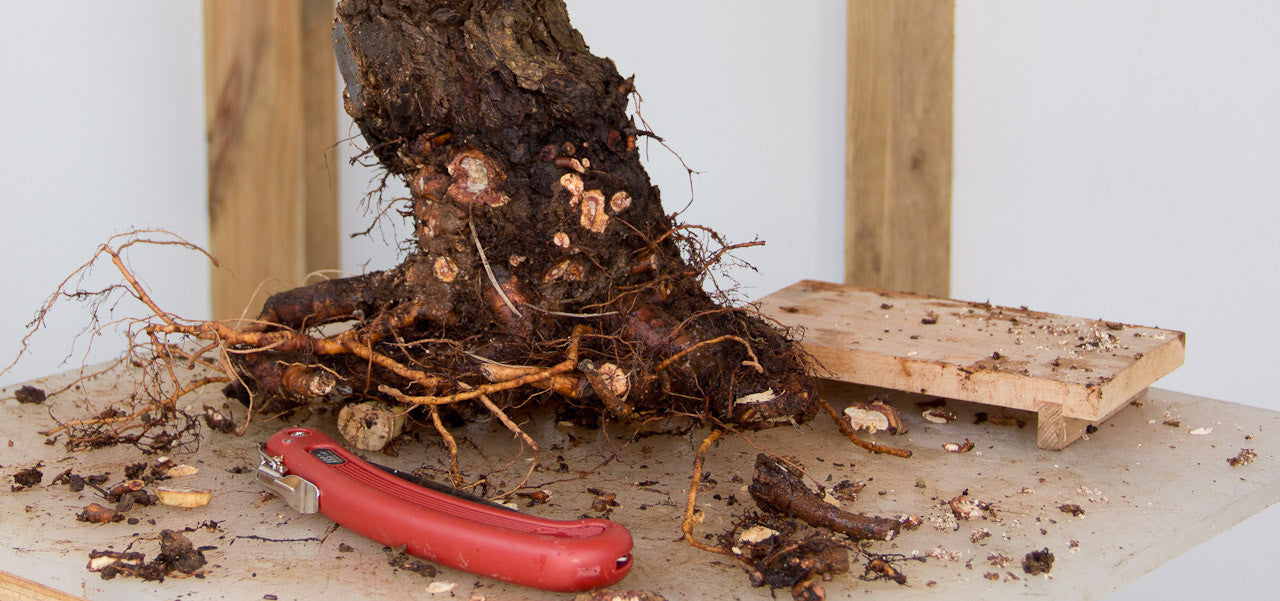
Image caption. The roots of the elm exposed after washing off the soil
On close inspection of the roots there were indeed some changes I wanted to make. It also became clear that while in the ground quite a lot of the wonderful trunk was buried under soil, evident from the many roots fairly high up on the trunk. When it was potted this planting height was kept, probably Stephen being overly cautious. However I know from experience that field grown trees have a lot of energy and one can be rather harsh in your treatment of them when it comes to root reduction.
I decided that I would definitely want to remove more of these roots higher up in an effort to:
- elevate the tree more, showing off the trunk which has been developed to greater effect
- and also so that it will ultimately be able to fit into a shallower pot which will further enhance the trunk.
Sacrifice Branches

Image caption. The first branch, what remains of the sacrifice branch used to thicken the trunk.

Image caption. A second stub from an old sacrifice branch
As you might have read in my previous blog posts on the subject of field growing, sacrifice branches are extensively used. Although it is possible to use field growing to thicken a branch also, sacrifice branches used to thicken a trunk are usually too thick to be of any use in the final design of a tree. Therefore they should be eliminated, generally speaking.
The problem, from what I have seen, is that many people are loathsome to remove these sacrifice branches entirely, presumably as they realise they will need to start from the trunk again. Stephen left these to allow the customer, me in this case, to make the decision.
What frequently seems to happen is that the new owner does not remove overly large branches and the tree will be developed from this point. Perhaps a nice canopy will be created but eventually the artist will realize the branches are out of proportion and should have been eliminated. However their dilemma is now compounded, as now they realize they will not only lose all the time and effort expended on developing the ramification in the canopy but will need to go all the way back to the trunk.
The moral of the story is to make the tough decisions now so you don't have to make even tougher ones later.
Working the roots

Image caption. Cutting the roots again
Using a good sized root cutter I reduced the roots further and made the cuts at an angle which would be better for the new roots to emerge at. The tree should ultimately be able to stand upright without being suspended in any way. This will ensure that putting it into a pot one day will be much easier. However it also points out when a root is protruding from the surrounding root mass.
It is very important to use sharp cutting tools when cutting roots or they may be more prone to rotting. They must heal quickly for them to remain 'viable' and for new roots to issue from their tips and not far from them.
Elm roots are extremely fleshy so it is easy to rip their wood, so be careful when working with them and ensure that your tools are suited to the task.

Image caption. Removing the roots from higher up the trunk
As mentioned earlier, it seemed as though the tree was growing reasonably deep in the soil. As I want to lift the tree I can go ahead and remove these roots from higher up on the trunk.
Shortening the trunk

Image caption. Shortening the trunk with the ARS medium toothed saw was a breeze
I referred to making tough decisions earlier and I had one to make on this tree also.
You might wish to refer to the very first picture of the tree that I showed you. You will see, on close inspection, that in the apical area the last step between the trunk and the apex has a knuckle/lump/fist - whatever you want to call it. I must admit that when I was buying it I did not notice this, but studying the tree at home is when I spotted it. Clearly the result of multiple sacrifice branches emerging all pretty much at the same level has caused this swelling.
Now I am no expert on cork bark elms and perhaps as the apical section developed more corky bark this feature would have become less obvious, I decided I was not going to risk it and so opted for sawing off the whole section. Yes, I now have a fairly large scar and will have to develop a new apex, but I will do so with a single branch and I am confident that in time the scar will heal over and be hidden by the cork bark.
Dealing with scars

Image caption. The prepared cut
When removing large branches there are many techniques for ensuring that as small a scar remains once the tree has healed over. I don't think this is as much a problem with this species as I have found it to be on others, for example the Celtis sinensis. Nevertheless you still need to treat large cuts properly.
Using an ARS saw, I removed the stubs of the old sacrifice branches. I then used a knob cutter to 'chisel' out a hollow in the wood. This will hopefully ensure that when the tree heals over this scar it will not do so with a protruding lump.

Image caption. Japanese putty type sealer finishes off the cut
On cuts of this size I recommend the Japanese sealers which are sold in small tubs and are essentially a putty. The deciduous one, used here, does not have a hormone which assists healing in it, but the conifer one does. Sealing large cuts like this with this putty works extremely well as the sealer is flexible and allows the tree to heal quickly beneath it. When the scar is healed over the sealer will actually just drop off.

Image caption. Sealing all the cuts
It is important to seal all cuts. This is especially true at this time of the year. Sap will be flowing strongest now and any cuts are going to act like a break in a pipeline and sap will simply flow out, weakening the tree and at the very least stunting its development until the tree is able to heal the cut.

Image caption. The large cut made to the apex must also be sealed.
Finally on to the wooden box!
I use rough sawn timber from a local timber supplier to construct my wooden boxes with. It's cheap, cheaper than a plastic tub I am fairly certain and it would definitely outlast any plastic tub. As it is pressure treated with wood preservative it will last longer than board too. There are several reasons I prefer to use wood over plastic (Read more about them here)
In case you cannot watch the video or are not able to make out certain details here is a quick step by step:
- I first work out the length of the box I will need. I then work out the width based on standard ceramic pot ratio's. This ensures I do not have a major problem when it eventually comes time to putting the tree into a ceramic pot.
- I make the base using several strips of 100 x 25mm wood laid side by side, spaced about 3-4mm or so apart to provide drainage. This means I do not need to drill holes and I dont need to use drainage mesh as my growing media will not fall through these gaps but drainage of water will not be impeded.
- I secure 2 'legs' under the base to elevate the whole box as this will allow more air movement and water to drain easily. It also makes sliding the box on a flat surface easier, should I need to do that.
- Then the sides are made and secured together with a 32 x 32mm strip of wood. This not only holds these side pieces together but also acts as handles later on.
- These completed sides are then screwed onto the 32 x 32mm strips on the base, which were used as 'feet'.
- Lastly the front and back is completed by securing wood strips to the two sides, which we just fastened. I start at the top and finish off with the last strip nearest the base so that should there be any overhang this will not show. Just looks a little neater.
Although I use stainless steel wood screws you can also use brass as it will not rust away. I would suggest you stay away from mild steel or other such materials as the fasteners will break apart in no time. As sometimes I disassemble these boxes to rebuild them, being able to unscrew the fasteners is important.
The main power tool I use is an cordless impact driver. I love this power tool as it has amazing torque and can easily drive screws into pretty hard wood without any pilot hole at all. You can also get different interchangeable bits for them which means no chuck to loosen and tighten all the time.
The table saw I use has got to be the cheapest saw out there, but it does the job for me. You could just as easily use a handsaw, it will just take you a little longer.

Image caption. Narrow gaps in the base to act as drainage holes.

Image caption. Coarse, crushed LECA used as a drainage layer
To promote maximum drainage in the bottom of the crate I am using a very coarse grade of LECA, up to 10mm particles. This will ensure the roots remain moist but not wet and so will readily ramify. You can also use stone of course but this will make this container extremely heavy. You could also use the medium sized pumice. (At the time of doing this work I had not yet received the pumice from Japan, although it is now in stock)

Image caption. Professional Bonsai growing medium is poured in.
On top of the coarse drainage layer I poured in a fair amount of Professional Mix. This mix contains crushed and whole LECA particles of between 2 - 4mm to which a long fibred white sphagnum peat moss is added for added water retention. This mix will provide the drainage I want, great exchange of oxygen in the root zone but will not require that I water too often. All this will lead to rapid root formation which will be critical to the trees health and indeed transition from field to container.

Image caption. Anchoring the tree
It is important to always wire your trees into the container. When a tree has just been root pruned it will be unstable in the pot. So it is important that you provide this stability in the form of wire, until it can settle into the new container and its new roots can harden off and mature to provide this structure.
As I mentioned earlier, elm roots tend to be rather fragile and so when wiring the tree in, extra care should be taken to ensure the roots are not damaged. I have used a piece of tubing to push the wire through and it is now the tubing which makes contact with the root and not the wire directly.
Conclusion

Image caption. The tree planted up.
After securing the tree into the wooden box and topping up the soil level with more Professional Mix, I gave it a good watering. It will now be kept in a sheltered spot out of the wind and receiving morning sun until it is clear to me that it has not suffered too much of a setback from this whole ordeal. I will judge this based on the amount of new foliage which has developed. At that time it will be moved to a more sunny position.
Fast forward a couple weeks and...

Image caption. New buds are pushing out all over a couple weeks later.
3 Responses


Leave a comment
Comments will be approved before showing up.

John
December 01, 2016
Thanks for the box story and video. That’s what I’ll build this late winter….before it’s time to move trees chopped. I have a nagging question in my head. Perhaps you can give me your insight into your choice for a wooden box. I read a lot of posts….many seem to believe that the colander or a pond basket is the answer to all things bonsai. Personally…I’m a box guy. I think the tree is held down more securely. When dealing with a good-sized trunk….does it really, seriously make a difference…box versus colander or pond basket? Your thoughts? …And I fully realize there are many opinions. I am though, seriously interested in your opinion as you have successes that demonstrate results.