


Orchids


Japanese Black Pine: Autumn Maintenance
Introduction
One of the concepts in bonsai cultivation I believe is often forgotten is that the techniques you apply to a tree differs depending on the stage of the trees development as a bonsai. In case you are not aware what there are or have forgotten them they are:
- Primary development (growing the nebari and trunk),
- Structural development (growing the primary branches),
- Refinement (growing tertiary and finer branches),
- Maintenance.
It is important to know where in the above stages you are with your tree in order to determine the correct techniques to apply. When searching for knowledge to increase your skill set and you read a blog or watch an instructional video, it is important to place the tree and the work in the correct development phase. Should you not be mindful of this you may be utilizing good technique at the incorrect time that may lead to unexpected and or mediocre results.
So for context I will confirm that this Japanese black pine is in the maintenance stage as the refinement of this tree is mature, although one can most likely never say "complete," as there are always improvements to be made somewhere. The techniques and manner in which they are applied below are not necessarily going to be the same as what might be best suited in your situation.
The challenge inherent to the maintenance stage is that the tree has developed into the profile you envisaged for it and now needs to be held at that size, but here's the catch, you cannot constantly be nipping off new growth in order to achieve this as the health of the tree would deteriorate.
In deciduous material techniques frequently differ to what we will use in coniferous as the challenges are different. However, the goals are largely the same:
- Maintain a dense network of twiglets with minimal dieback.
- Maintain delicate branching ie good branch taper to the tips.
- Ensure the future of the branches.
History and Observation
To better understand what course of action is required on a particular tree it is advantageous if you know something of the recent steps or actions. I imported this pine in spring one year, in winter of the same season it was wired. It was allowed to grow untouched for the full season that followed. In spring of the new season, as very weak growth was observed during the previous season, I repotted it to invigorate the tree (Typically the more mature the tree becomes the less frequent you want to repot as this helps to control growth - to a point after which the health of the tree begins to decline. Knowing when this point is reached is a matter of experience).
Usually, barring some exceptions, one does not decandle in the same year as repotting a tree of this age as the root system would have had little time to recover and thus would have few resources with which to respond to the decandling and push new buds. So it was not decandled and simply allowed to grow, but that now brings me to the current state of the tree.

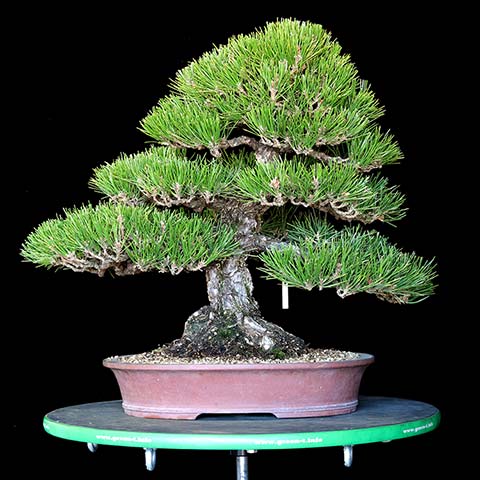
Tree prior to the intended work.
With the tree on my worktable I can observe how it responded to the previous treatment. This is what I noted:
- The tree vigor has increased substantially and wire bite is beginning to occur.
- There are a number of fairly strong candles which have developed long needles.
- Energy is very unbalanced with the apex being the strongest and the lowest back branches being the weakest.
- A good number of adventitious buds have formed along the branches.
To do list
- Remove wire to avoid further wire bite.
- Pluck needles to balance energy for more even candle development in spring.
- Shorten overly long needles to promote light penetration.
Remove wire
I originally wired this tree with copper. Copper hardens as it is applied and this phenomenon increases its holding capacity but it also makes it difficult or impossible to remove all but the thinnest of gauges from the branches by unravelling. So the wire needs to be cut. It is advisable to use a bonsai wire cutter for this as the rounded nose is designed for repeated cuts of wire while limiting the risk of cutting the branch itself. I also find what is called a Jin pliers to be helpful for removing wire as sometimes wire needs to be dislodged even after being cut. If wire has bitten in you will first need to lift it using the pliers before being able to cut it.

See the wire I initially missed? This could lead to some nasty wire bite if left in place.
Copper wire oxidizes very quickly turning black in colour, which makes it more difficult to see on the branches so very thorough inspection of the branches are required to ensure you do not miss any wire. Failure to remove the wire completely may result in unsightly wire bite and you may ultimately need to cut the branchlet off.
Removing wire from a tree of this refinement takes time, I believe it took me an entire day, so you can guess how long it took me to apply! It is a good opportunity to study your own wiring technique, if you wired the tree to begin with, and see where problems lie and how you might improve your technique for the future. Care was exercised in gathering this wire into a bin as I don't want it to end up in a landfill, it can rather be taken to a recycle depot.
It's not about the money for the wire recycling - its about the environment.

Wire removed from the tree, neatly collected for recycling.
Needle plucking
Needle plucking on pines is performed using a purpose made bonsai tweezer and is a task which is performed for several reasons at different times of the year.
Without needles there is no sapflow to a branch and it will weaken and die. Bear this in mind when determining how many needles to pluck; too many and the branch is weakened and if this is done repeatedly over successive seasons the branch may die. Plucking too few and the reason or goal for plucking in the first place is likely to be missed.
Rather than get into all the variations of this technique I will speak entirely to this particular instance.

Strong candles make it easy to identify the strongest zones of the tree.
In order to begin balancing the energy ie. directing energy away from the strong parts of the tree to the weaker, more needles need to be plucked in the strong areas and the weaker areas are either left alone or only a few needles are removed. Usually when you read about the quantity of needles to remove, the author refers to pairs of needles and not individual needles. For this two needle pine I will pluck needles down to 3 - 4 pairs (6 - 8 needles) in the strongest areas and keep 6 - 8 pairs (10 - 12 needles) in the weakest. With more needles in the weak areas and less in the strongest more sap will flow to the weak areas strengthening them.

Buds on a weak branch. No candle extension occurred in this area during the past growing season.
Where candles did extend this past growing season, but where I also find many 2 year old needles I will thin some of the 2 year old needles making sure to keep some as they are said to be beneficial to the health of the tree. Start plucking needles at the bottom of the branches first, retaining those on top which are also more exposed to sunlight. This also produces a more aesthetically pleasing result, with clean undersides to the foliage pads.
Needle cutting
Many years ago I was told that cutting needles would eventually lead to shorter needles. Although perhaps this might very indirectly occur, needle cutting is not a technique utilized to achieve short needles. The main reason needles are cut is to increase sunlight entering the canopy on ramified trees where this is much reduced due to the dense canopy. In order to keep inner growth healthy, sunlight must reach them and this is one way to achieve this. The tree finds itself in need of needle cutting as the candles of this season were not cut. Were the candles cut the needles would have been much shorter and would not need cutting.
I must stress that needle cutting is used only in certain situations, it is NOT the go to technique for achieving short needles. The tips of cut needles brown, this is unavoidable and unsightly, although using short scissors and apparently misting, does limit the browning. I do not appreciate the very crisp, stylized and topiary-like aesthetic of the foliage pads created by the cutting of needles, the natural needle tip is very much more appealing however it is not uncommon to see especially shohin trees displayed in Japan with a few cut needles here and there.
Future proofing
As pointed out earlier in the text, the past growing season's candles were allowed to extend uncut. This extension increased the vigor of the tree. Once a tree has settled into the cycle of maintenance, controlling needle length and building ramification is the product of needle plucking and decandling. However in this case as decandling was not possible, some of the candles developed very strongly (as the tree was also not needle plucked) and this growth was coarse. Ultimately this growth will need to be removed to enhance the taper of the branches in the canopy.

Invaluable buds which need to be nurtured as they will ensure the future of this branch.
However allowing the candles to extend aided by a good feeding regime and with sufficient light, adventitious buds will form along the branches even fairly old ones provided bark has not formed on it. These buds ensure the future of the tree as it is to these buds that the branches can eventually be cut back to, once the buds have developed into strong enough shoots.

Adventitious buds readily form on healthy trees
Encouraging the development of these buds is of the utmost importance during most phases of pine development but especially so in the maintenance stage.
Bear in mind that buds will never develop on the neck of the candle, the area which never produced needles. Buds can only develop where once needles were or still are.
Branch removal
In a previous post about the styling of a Japanese white pine, I remarked on the removal of branches and how to cut them, to a stub or to the surrounding trunk immediately.

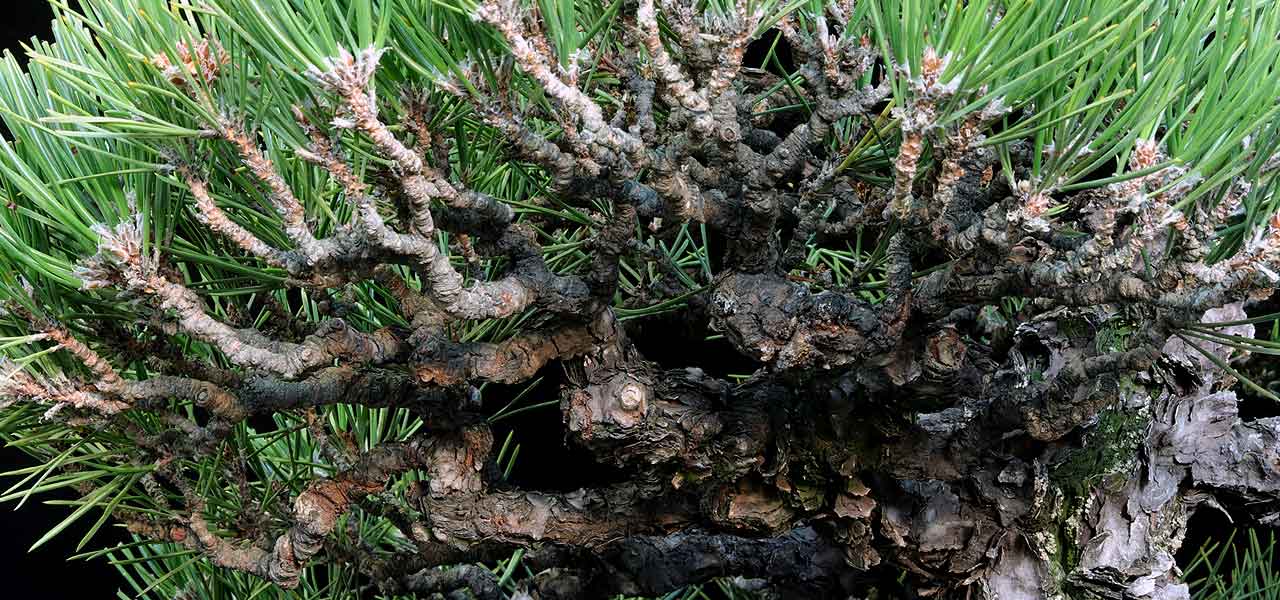
The outcome of two approaches to dealing with branch removal.
Here you can see the outcome of two different approaches.
On the left a branch was cut and a considerably long stub left. After a couple seasons had passed the dried wood of the stub was shaped into a small jin using a jin pliers. You can see a complete absence of swelling at the base.
In comparison, to the right you can see what happens when a branch is removed completely, the cut shaped with a knob cutter and not treated with putty type sealer. The callous formation is both ugly and the swelling has contributed to reverse taper. Instead of cutting clean and gouging the cut should have been shaped to a peak, proud of the surrounding tissue and then properly sealed with conifer putty type sealer.
End result
I would like to acknowledge Mr Koji Hiramatsu of Hiramatsu-Shunshoen for his guidance in the scope of work detailed above although he has neither read nor does he endorse what I have written.
Leave a comment
Comments will be approved before showing up.
