


Orchids


5 Tips for better junipers
The following article is not intended to be a detailed care guide to Junipers. There are gaps in the information, but in the future I will write additional articles in which I will focus on certain aspects.
I'd like to thank Jose Rodríguez, Brett Simon and Mark Polson for assisting me in the following article and for their individual contributions to the content.
Introduction
The juniper species in general is extremely popular the world over as material from which to grow bonsai trees. There are many reasons for this but I'd venture that it is as you can rather quickly transform a juniper bush into something resembling a bonsai tree. For this same reason it is possibly the most popular species to use for demonstrations too.

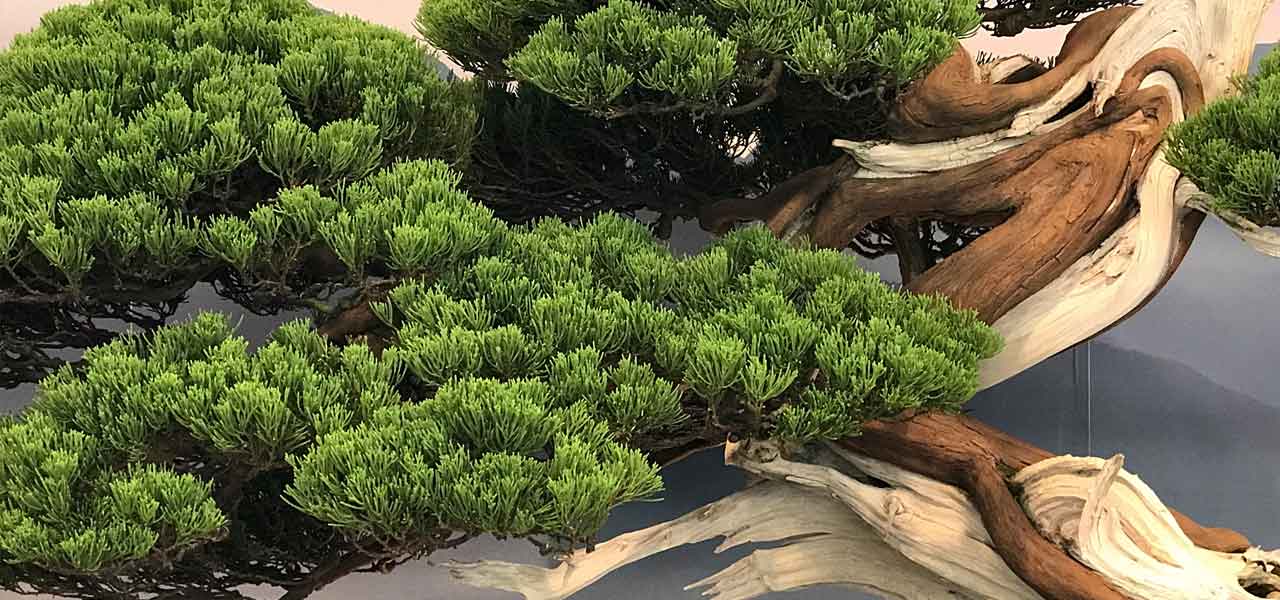
Image caption. Taiwanese juniper on display in November 2017. Created by Master Lee Zhong Hung, cutting grown.
However, and I can only write in the context of South Africa, from my observations I see the same species being used over and over again, most of the trees are very immature in appearance and lacking in character or resemblance to the wild specimens which we are or at least should be trying to draw inspiration from.
There is no secret or mystery surrounding the development of good juniper bonsai, as is always the case you need to start off with good material, developing it over time executing certain steps at certain times.
The following 5 tips are meant as suggestions aimed at helping you to grow better juniper bonsai trees.
Tip #1. Buy, grow or collect worthwhile material
Buying
Visit local bonsai nurseries as they should keep stock of suitable junipers, which have been developed with the bonsai artist in mind. Run of the mill retail nurseries also sometimes have decent material and sometimes you may get lucky and find some old juniper in a neglected part of the nursery.

Image caption. Working on some good stock of Itoigawa juniper in Japan.
How much money you spend to a large extent determines what quality of material you are going to get. Buying what is essentially a rooted cutting is going to take much longer in development to achieve a small or medium sized bonsai, never mind a large one. Spending more and buying something bigger or with a more developed trunk is going to shave years off development time.
Grow
Its relatively easy to grow juniper from cuttings and layering. Layering will of course produce a plant which already may have a substantial trunk if you can find an old mother plant growing in someone's garden or perhaps even in your own. Cuttings are however a popular means of propagating plants in general and although it may take some time, even up to 2 years, you can produce a lot of rooted cuttings from a single parent plant. Another great thing about cuttings is that they will all be genetic duplicates of one another and the parent plant.
Regarding when its best to take cuttings; it seems generally the best to take then in early summer or again in autumn. After the spring push, once these shoots have elongated and beginning to harden off with the stem changing from green to brown or again in autumn before the spring growth thickens.
Collect
Although we don't have juniper growing wild like we do olives, making collecting old specimens from the mountains as they may do in the USA and Europe a pipe dream, we can do some urban yamadori. Many homes and farms have various species of juniper planted as hedges or as bushes in their gardens. Should you know such a person or be able to get permission from a land owner such trees could make awesome material from which to develop a bonsai. Some planning is required though in order to ensure the survival, or at least increase the odds, of the collected tree surviving. Junipers cannot be collected as for example a wild olive ie dug up, fat cut and placed in a well draining medium with new shoots developing in a couple weeks. Junipers require special care. I do not profess to be a highly experienced collector of Juniper but I have compared my notes with others and I can write the following with reasonable certainty:
- If you can prepare the tree a season or even two for collecting by cutting into the root zone around the tree. Don't however dig all the way around, rather do it using a staggered approach. Push your spade in severing the roots, then skip a spades width and repeat. Continue in this fashion all the way round the tree. The following season dig in the areas you missed the previous year. This will enable the tree to continue growing with the untouched roots, while it attempts to issue new roots where you cut. This will dramatically increase the odds of the tree's survival when you do collect it as it will already have finer roots close to the base. Timing for this would be very late dormancy, as the tree is waking up and the buds on the foliage are just beginning to swell. (Actual lifting of the tree would be left till the following Autumn, see cuttings above)
- If its a very large bush, you can reduce the canopy of the tree by up to 30%. This will result in the formation of many new shoots along the older branches. These will be very useful not only for the future survival of the tree but perhaps also for the future design of the tree. You may decide to cut a specific branch back considerably but leave another or only subject it to a light trim. Or you may cut the entire tree back by the suggested percentage. Bear in mind that the energy or strength in junipers is in their foliage so cutting the whole tree back to a stump in one go is likely to kill it. For the same reason, if you do not need to cut any foliage off then rather leave it alone, and reduce the foliage after the plant has been collected. Cutting the tree back in this manner is best done during the active growing season, after the initial growth has extended and hardened off.

Image Caption. Mark Polson collected this juniper from a farm (with permission) and has developed it into what I believe is one of the best local junipers.
Tip #2. Consider and select good species
You may have noticed that I have used terms such as "good," "worthwhile," "better" and others in this article. What they mean precisely is somewhat subjective and is likely to change over time. No doubt when all of us began bonsai our first experience with a juniper was most likely a pencil thick procumbens, no taper and covered in scale type foliage, but we were terribly excited about it.
The fact is that there are many different species of juniper and although most if not all of them can be grown into a bonsai to some degree of success, some species are simply better. By "better" I mean:
- they develop a fatter trunk faster than another
- the foliage has a pleasing colour
- does not readily produce scale-like, juvenile foliage when trimmed (Think "procumbens")
- the foliage is compact and bushy {as opposed to flat} making it far easier to achieve a dense canopy, the opposite to this would be limp, leggy and or flat foliage.
When purchasing, collecting or growing juniper stock for styling as a bonsai consider the above in the context of what you want the final tree to look like. In addition, don't forget to consider the growth characteristics of that species. If its naturally a creeper then an upright style is going to be more challenging to achieve than perhaps a cascade as you will be fighting against the natural growth characteristics of the species.

Image caption. An Itoigawa juniper I imported for resale a few years ago. The foliage is one of the most sought after today.
In South Africa, the most commonly used species would most likely be:
- Juniperus procumbens, a low-growing shrubby juniper native to the southern Japan.
- Juniperus procumbens 'nana', same as above but a dwarf variety.
- Juniperus virginiana 'Grey Owl,' finely textured, arching branches with a soft, silver-gray foliage.
- Juniperus chinensis 'Blaauw,' grows as a shrub or tree.
- Juniperus chinensis 'Kaizuka,' typically grows as a shrub or tree.
- Juniperus horizontalis 'Prince of Wales,' another spreading or ground cover type juniper.
Tip #3. Create interest during development
The benefit of growing your own material is that you can begin working on it while its still in the ground, a large container or bag. When its collected you have to work with what you have, same applies to buying material.
What I mean by creating interest is essentially the shari and jin; the intertwining of live and dead. All too often I see junipers with either no deadwood on them at all, or a very poor attempt at creating shari by removing a parallel line of bark on the front of the trunk. In nature, junipers we find impressive are coiling, their live veins snaking around the trunk. Evidence of old branches (jin) which died and now bleached by the sun add to the impression of age and speaks of the hardships the tree has had to endure.

Image caption. Mark Polson can be seen here removing bark on a young juniper to create shari
Begin creating these details in the tree as soon as possible during its development when the tree is dormancy. This will present the least risk to accidentally stripping bark from the tree when it is very loosely ie during active growing periods. If you can get the timing correct then during the plants summer dormancy period would be another good opportunity. This would be after the spring growth has hardened off with its colour turning from light to dark green, but before the second growth period during autumn. (A little test you can do is check whether the bark comes off easily)

Image Caption. How many of you have actually see a Juniper procumbens growing wild in Japan where it is indigenous? This photo was sent to me by a friend and what is of particular significance is the deadwood. Please use this as inspiration when working on your own procumbens as including deadwood like this can dramatically increase the appearance of maturity and renders the tree far more dramatic.
There are essentially two methods of creating shari, with many variations or combinations of the two. You can either wire the tree and allow the wire to bite into the bark. When visible swelling is noticed and a change in the sapflow has been established you can remove the wire and then start removing the bark from the "trough" of the swelling, where the wire was.
The other method which perhaps is more common is to begin by either drawing or imagining a line snaking up and around the trunk. Along that line remove narrow and relatively short sections of bark. Over successive years you can increase the size and length of these sections until they meet. You then continue removing bark over time, each time widening the deadwood by removing more bark on either side.

Step 1 in creating shari. Remove some bark. Sketch by Jose Rodríguez.

Step 2 in creating shari. Remove some more bark in the following season. Sketch by Jose Rodríguez.

Step 3 in creating shari. Remove yet more bark over following seasons until you have a snaking shari alongside which your live veins will gain in thickness and begin to bulge. Sketch by Jose Rodríguez.
You will also need to make some interesting bends in the trunk and branches. For this please see a previous post where Brett Simon demonstrates a method of doing this.
Tip #4. Don't be afraid to graft
Until recently I could find nobody local who was grafting junipers. Fortunately times have changed and artists are beginning to realize the potential being able to graft offers. I do not wish to go into detail about the technique, Mark Polson did however demonstrate one of the methods to us in video and also wrote an accompanying article. Watch and read it here.
I will however point out 2 benefits grafting will offer you:
- If you have a great trunk but poor foliage you will be able to change the foliage to a better type over several seasons through grafting.
- If your design requires a branch in a position where you have none, you can either hope something develops, or simply graft a branch on.

Image caption. Here Mark can be seen in action preparing to graft. A sharp grafting knife is key.
Tip #5. First the bones, then the meat
All too often the temptation when sitting in front of a juniper bush, especially something which has a bushy growing habit is to give it a basic styling with wire; positioning the branches and foliage pads then to sit back and enjoy.

Image caption. A juniper recently styled by Koji Hiramatsu. As this is the initial styling the foliage will become dense over time, but the underlying structure of the branches has been created.
Just as with any other tree you need to start with the trunk, move on to the main branches, then to the secondary and tertiary. Initially when you remove the superfluous stuff it will feel like you are taking the tree backwards as it can look rather stark. However in the long term if you get the structure/foundation/skeleton/bones correct, not only is the meat (foliage) going to look much better, but more importantly you will be able to sustain the design and health of the tree over a much longer period of time.
Click here to view the Juniper gallery I have put together for your additional motivation
Leave a comment
Comments will be approved before showing up.
