


Orchids


Bush to Bonsai Chinese Elm
My earliest record of this tree is 2008 when I purchased it from a local bonsai nursery as a bag starter tree. The trunk being too thin at that stage for it to be considered to have much potential I planted it in the ground and through field growing it for a number of years I was able to fatten the trunk. In 2013 it was for the last time lifted from the ground and planted into a container, in which I have been training it since. This species of elm has a particular growing habit where the trunk does not readily thicken, in fact compared to other elms planted in the ground for a similar time it is roughly half the girth! It also seems to prefer fattening up the branches rather than the trunk.
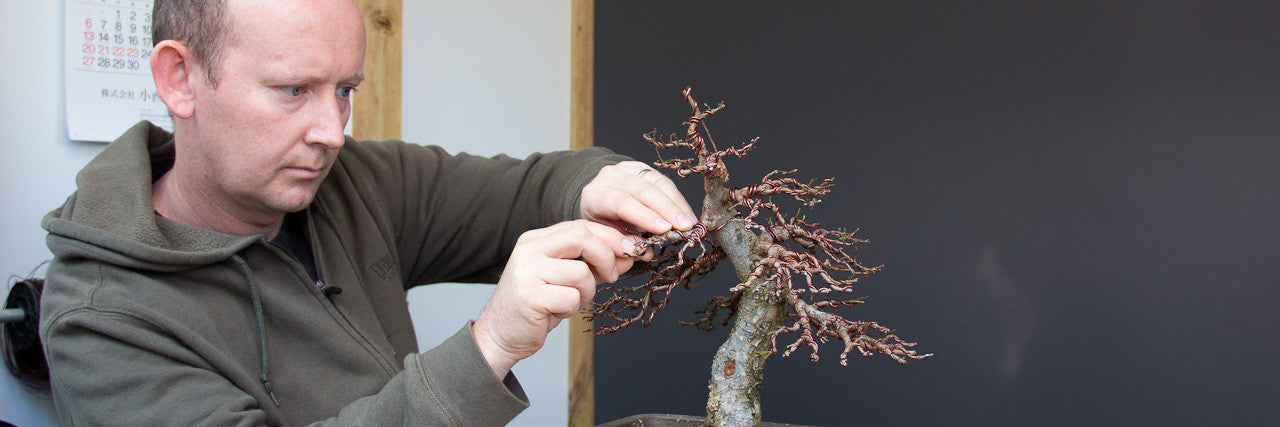
Anyway, enough history and back to the task at hand! Late spring, when the new leaves and branches have hardened off is the best time to style deciduous trees. I know many people believe doing it in winter is best, but I have been taught this method and it works so I will continue with it. One of the major advantages of working during the active growing season is that the tree is alive and can respond. Pruning in winter for instance will generate no back budding as there is no sap flow. Conifers on the other hand are preferably wired in winter like this Japanese Red Pine which I styled a few months ago.

Image caption. The tree before starting any work
As the branches of the trees are hidden behind the mass of leaves the first thing we must do is reveal the bones of the tree by defoliation. To do this you may use trimming scissors, a leaf pruning shears or, if you are careful and if the growth is tough enough, your fingers. If you do use your fingers be very careful that you do not rip off the dormant bud at the base of the leaf, so pull outwards. Defoliate the tree from the top to the bottom.
This tree is strong and healthy so I can defoliate the entire tree. If you have a tree with weak inner shoots you should not remove the leaves of those. The extra sunlight allowed in by removing the outer leaves may trigger these weak shoots into growth.

Image caption. After defoliation the bones of the tree are revealed.
Once defoliated you now can clearly see the branches which you have to work with. Its a good idea to study the tree from various sides and angles, turning and tilting it as the need arises, in an effort to find the front of the tree. This is essentially the best side of the tree which displays the roots and trunk at their best. Some considerations would be:
- Which angle gives the tree the most interesting movement.
- From what angle does the trunk have the best taper.
- What side does the trunk appear thickest.
- Which side shows a nice flow from the trunk into the ground through the roots.
- It is also preferable to choose a side which shows the least number of scars, or none at all.
When you have found the front mark it with a couple sticks or what ever you have laying around. This will help you retain the same position all through styling.
An important benefit of defoliating as was done in the example, is that it also promotes ramification, which is the network of fine twigs a well ramified mature tree has. However simply cutting leaves off the tree will not stimulate the back budding which leads to ramification, it must be accompanied with trimming of branches. This is done with a suitably shaped scissors which enables you to reach the inner parts of the canopy without damaging branches.

Image caption. Systematically working up the tree wiring each branch.
Learning how to wire properly early on as a bonsai artist is an indispensable skill. The best way to learn is to practice a lot and ideally with someone who is experienced at wiring. I've heard some say how you wire does not matter, or how messy it is. It matters very much because:
- sloppy wiring is an eyesore which you will have to look at for months.
- bad wiring technique will not allow you to attain the goals for wiring to begin with.
- poor wiring skill will result in broken branches.
- fear of wiring for whatever reasons will limit your growth as an artist or delay the development of your trees.
Generally speaking we always use aluminium wire on deciduous trees and copper wire on conifers. This post is not about wiring, so I will not get into the details but the reasons for this is due to the inherent properties of the two metals which dictate this.
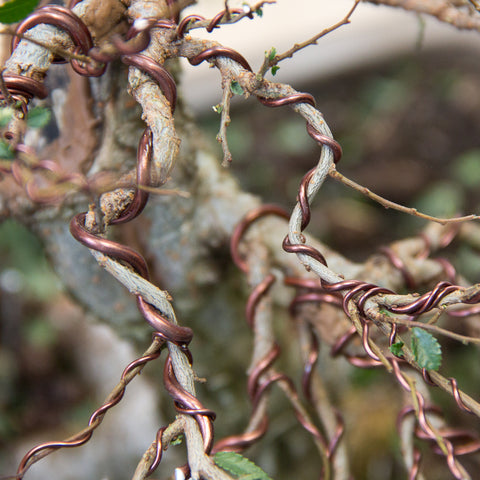
Image caption. A little wiring tip which may be the difference between a broken branch or not.
Wiring requires planning. Its like playing chess, and having to think three or four moves ahead. I was never any good at chess so I must make up for my shortcomings through practice when it comes to wiring.
When wiring a branch, try to consider where you will place the bends and wire so that the wire lays on the outside of the bend. This will allow you to make large bends without the branch snapping.
It is best to start wiring your tree from the bottom, ending in the apex. There are many reasons for this not least of all that it creates space in which you can work as you move up the tree.
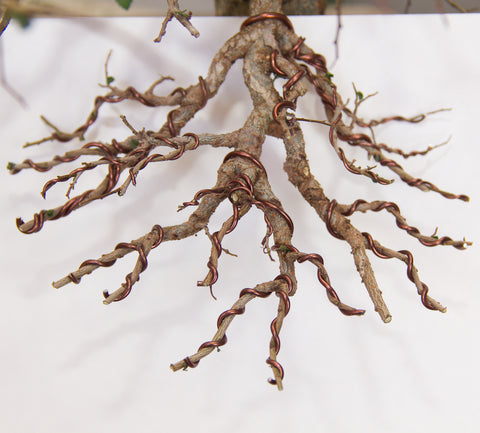
Image caption. Completed wiring of the counter balance branch which is also the first branch.
All branches should begin at the trunk and radiate outward. As they extend outwards they should fork, and then a little further on fork again. This means one branch becomes two, two becomes four and four becomes sixteen and so on. Contrary to what you may have read or the illustrations you might have seen in bonsai books, so called "herringbone" branches that look more like a fishbone than a tree branch has no place in bonsai styling. There are many reasons for this but here are a few for you to consider:
- In order to build dense, finely structured canopies made up of many twigs you will need sufficient sapflow to support this growth. You will never achieve this sapflow if you only have a main branch with off-shoots, or you may achieve a measure of ramification which will suffer continuous dieback.
- One herringbone branch will not provide sufficient room to create a foliage pad.
- Long term maintenance of the tree will be impossible as eventually all branches will become too thick and therefore too coarse meaning you will have to eliminate them, leaving you with only a trunk.
As you draw closer to the outline or extent of the tree's canopy, the internodal distances will become increasingly smaller. These are the distances between dormant buds. When these distances become too great it becomes difficult to build fine structure and this is why it is so important to feed appropriate fertilizers in the correct dosages and at the correct times, as determined by the stage of development.
It is also for this reason that deciduous trees are hardly ever used as demonstration trees at a bonsai convention. Deciduous trees take a long time to develop and the process must take time in order for a satisfactory result to be achieved. The process requires planning and patience. One must have a fairly clear idea of how you would like the tree to look in five to ten years, as changing this vision is going to set you back years. In conifer trees, even thick branches can be bent using the right techniques. This is not so with deciduous trees, as once the branches are 2 or 3 years old they cannot be bent anymore without the risk of snapping.
Image caption. Completed wiring of a back branch.
The back and front branches are very important for creating a sense of depth. Very often an enthusiast will style a tree but focus only on branches going to the left and right, but almost completely forget about the branches which give the tree volume.
As mentioned earlier, as we near the outline of the tree ramification should increase. You will note from the images of the foliage pads that I seem to be contradicting myself as some branches are fairly long without interruption. There is an explanation though. This is the first defoliation of the season and if the tree responds well then we will be able to repeat the process perhaps even several times this growing season. Effectively its like having three or four springs in one year. I have pruned back the growth to clean up the lines of the foliage pads and to allow light to the branches beneath that pad. I expect budding further back along the branches. When I next defoliate I will prune back to the finer twigs which have developed, and eliminate the longer and older growth. This process of branch selection and replacement is very typical of deciduous bonsai tree development.
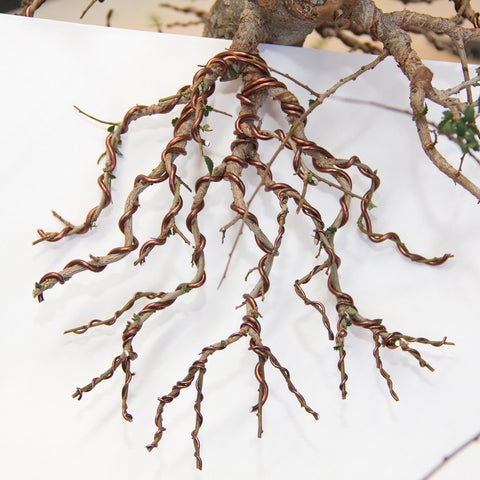
Image caption. Completed wiring of the main branch.
The main branch, or in Japanese the "Sashi-eda" is the most important branch for composing the style of the tree. It is also usually the largest of the branches. Once this branch has been styled the rest of the tree follows the same approach to styling. In other words if the main branch is wired rather straight with very gentle curves all the other branches should have the same look. In nature you couldn't imagine a single tree with multiple growing habits could you? So one should not see it in a bonsai either as it will only cause confusion.

Image caption. Side view of a branch pad starting to fill out.
When you give some character through the use of wiring, to the branches and the secondary branches you cannot only give them shape from the top, they must also have shape from the front. Shape from the top has less of an aesthetic value and more of a practical one. You need to create spacing between the branches to allow sufficient room for your fine branches to develop into. However movement from the front creates volume to the foliage pads as well as interest.
It is best to develop the primary and secondary branches before developing the tertiary ones. If you developed them all at the same time the tertiary branches will simply grow stronger and stronger as they get more sunlight, and primary and secondary branches will weaken being shaded out. So in the beginning when you are just starting off with developing branch structure on a tree, the pads can look pretty flat.

Image caption. Any new or old cuts should be treated appropriately.
As you are working your way up the tree you may need to remove some overlapping branches or you may encounter old cuts.
To remove a branch you can do so with a single cut using a rounded branch cutter which essentially is a combination between the ordinary branch cutter and a knob cutter. If you encounter stubs left over from previous a pruning then you can reduce this swelling with the knob cutter. It is most important that you seal the cuts you make, especially the larger ones as this will promote healing. I would recommend to use either the toothpaste type sealer for smaller cuts or the putty type for larger cuts.
For larger scars you may first need to remove any rotten wood before sealing as cambium will not cover such surfaces. For especially large and deep deadwood areas you may need to fill with a cement and sand mixture and then cover the live edges with sealer once the cement has hardened.
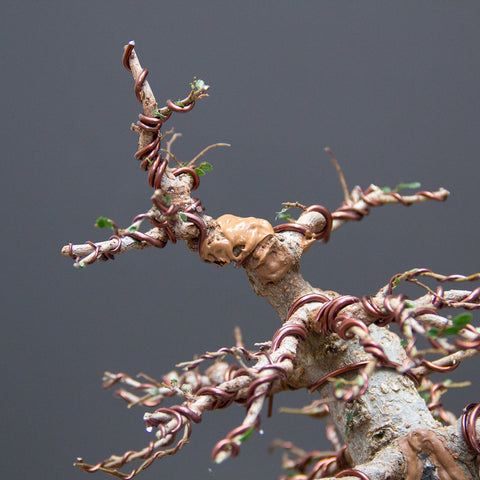
Image caption. Branches in the apical area should be delicate, if not they should be removed.
It makes sense that as you near the top of the tree the branches should become increasingly delicate. As I mentioned before, this tree seems to have a nasty habit of thickening branches before the trunk and so some of the branches in the apex got too thick before I realized it was happening. So they had to be removed using a small knob cutter and sealed.
Make the tough choices now of removing undesirable branches and you will save yourself making them later and losing years of development work.
Another more stylistic comment is that at the bottom of the tree the branches have a downward or drooping angle, which makes them appear older. As they near the apex however the angle changes to become increasingly more vertical. This is another reason why it is best to begin styling a tree from the bottom and not from the top, you would not know how to position the branches otherwise.
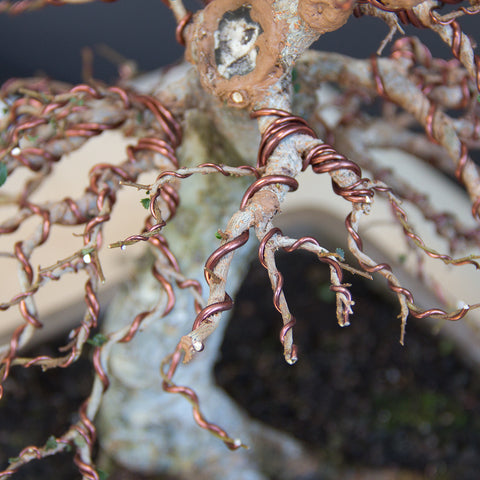
Image caption. Promoting back budding on branches.
In the image above, in the center of the branch in focus, you will see a rather thick twig. This twig is too thick for this area and should be more ramified, like its neighbor. As it was another one of those branches which got away from me, I now have to hope for this work to stimulate back budding along this branch so I can eliminate it and use the new branches in its place. On a young tree with young branches like this I don't doubt that I will get a bud at each internode but on older trees the results might be less predictable.
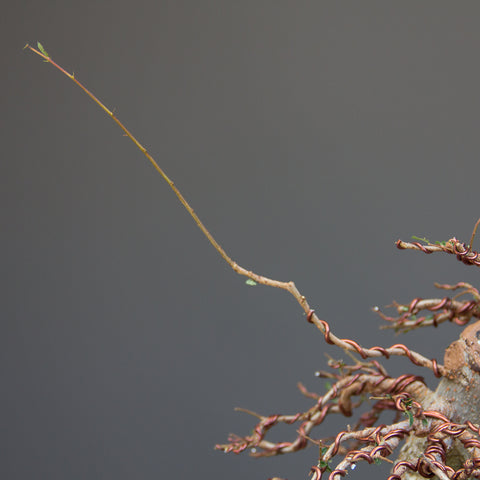
Image caption. Sacrifice branches are an important technique for use in building branches.
Sacrifice branches are branches which fulfill a purpose and then are completely removed or drastically shortened. These purposes might include:
- Healing a large scar directly below them.
- Thickening a trunk.
- Increasing taper by thickening the portion of trunk below the sacrifice branch but having no effect on the area of trunk beyond it.
However they are used extensively to thicken the base of a branch which will be kept, as is the case here. The thickness of the branch where it joins to the trunk should be aesthetically pleasing but also must make sense i.e. you cannot have a pencil thick branch at the bottom of a pole thick trunk. So in the image you can see a branch which is near the apex but which needs to be thicker to be in keeping with the surrounding branches.
Let these branches grow unhindered and do not cut the tip! Remove all side growth so all growth hormones move into the tip forcing it to extend even more. As it extends the base will thicken to support it.
When the base of the branch has reached the desired thickness it will be pruned back using suitable scissors. The secondary branching can then be developed and so on.
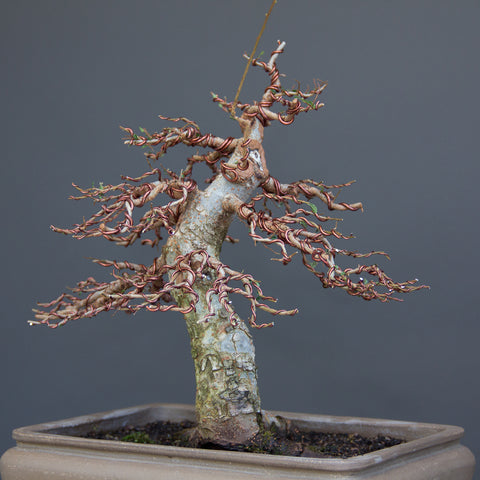
Image caption. Outline of the tree's canopy.
When you look at trees in nature you will see they have a rough outline. Branches generally don't extend past this outline. In bonsai we should echo the same effect. The angle of the image above illustrates the point I'm trying to make quite nicely. When styling your foliage pads you should be seeing an imaginary outline around your tree and all growth should be retained within those confines.
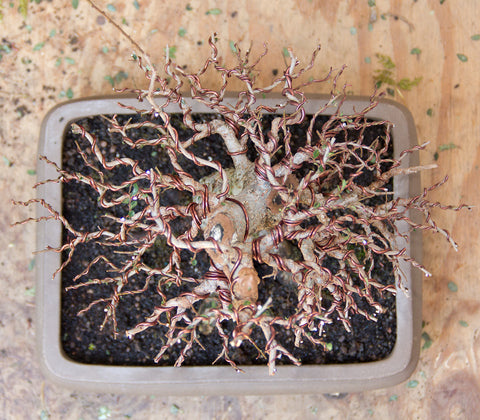
Image caption. Birds eye view of the canopy.
Another good angle to view your tree from when you are styling it, is directly from the top. You will very quickly see any gaps in your distribution of branches and whether the tree is balanced front, back and sides. Make mental notes about areas which need to be developed further and allow those areas to grow more before trimming back again in the future.
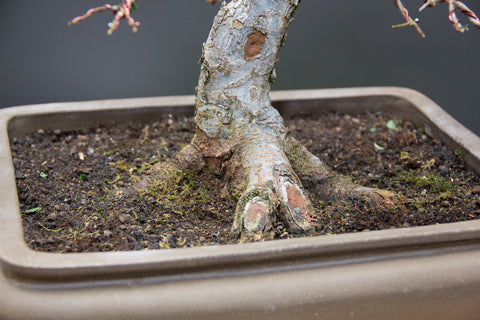
Image caption. Some ugly nebari which will need to be corrected.
Usually the nebari or surface roots should be corrected as early on in the styling process as possible. I must admit that I have neglected doing so in this case. I was hoping I could correct it by simply scarring the tree, making holes in it, applying rooting hormone and mounding suitable rooting medium around it, but this did not work.
So my plan is to layer the tree next spring. The ground layer will be done very close to the ground essentially just in the area of the trunk flare.

Image caption. The completed tree, inset image of the bush it started off as.
Five hours later and above you can see the final result. There are some gaps in the apex of the tree which need further development but as this tree, like most, is apically dominant I am sure to get plenty of new shoots in this area. If anything, the apex is the part of the tree which requires most frequent replacement in mature specimens as sap flow to this area is strongest in the tree resulting in coarse growth unless its carefully controlled. The pads need a lot of filling out but this will happen in the natural course of things through repeated defoliation followed up in my case with light applications of BonsaiBoost.
I hope you have enjoyed reading this post and that it has in some small way inspired you to finally style that neglected tree you have in the back corner. Some of the content might be a little difficult to follow at times (apologies!) and perhaps a tad advanced for novice artists but if so please feel free to comment in the space below and I will do my best to answer your questions.
11 Responses


Leave a comment
Comments will be approved before showing up.

Corne
December 29, 2016
Such a great story. Really enjoyed it and feeling so inspired and motivated.