


Orchids


Field growing Hackberry Part 2
In the first blog I wrote on the subject of field growing Hackberry for bonsai {If you missed it you can read it here}, I essentially share with you the techniques on how I grow the trees in the ground. In this second part we will revisit the same trees, 2 years later from when that blog was written and I will describe and show the steps taken to arrive at the next stage of two of the trees' development.
I know I did write that the trees should be left in the ground for several years. I'm not changing this suggestion, only the reason I lifted these trees was as I was asked to do a talk on field growing for the Oyama Bonsai Kai. Talk is cheap, showing is much better. So I selected two trees which I felt had been in the ground long enough and could perhaps be developed further in a box instead.
The following photos and text describe what was done.
Removing from the field
You will notice that in the first season after a tree has been harshly root pruned it will expend most of its energy in putting new roots into the ground. In the seasons to follow it will become progressively stronger.
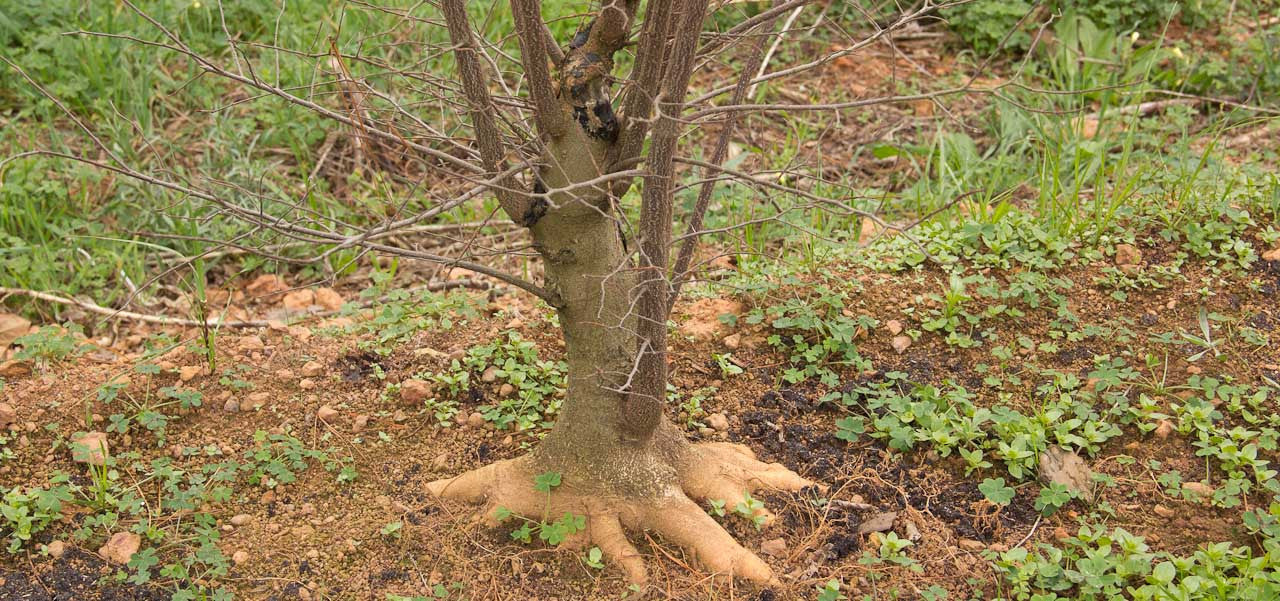
These trees are from a batch of 10 or so trees which I originally started from seedlings over 10 years ago. During that time they have been lifted and root pruned several times, each time chopping the trunk back to work on the trunk taper and movement. At the same time the roots were always worked on, with the focus being on developing attractive trunk flare and roots which radiate outwards from the trunk. {Although it works extremely well to do this with a tile and in the ground, you can also do it in a wooden box or container using a wooden board. Read more about the process here.}
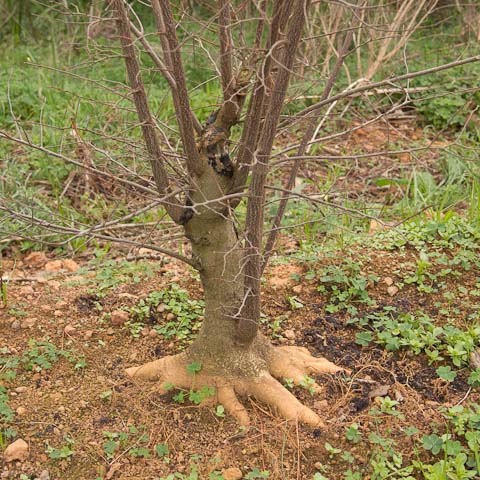
Image caption. One of the two Hackberry I have selected to work on.
The tree in the image above has now been in the ground for the last 2 full seasons. You can see how strong the new branches which developed during this period are.
Step 1 - cutting back
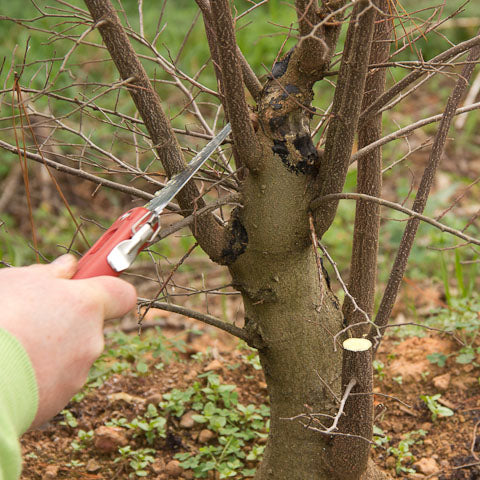
Image caption. Use a saw to rapidly reduce the branches which have developed in the ground.
As the branches which developed in the ground are usually not used in the final design they can be removed. One can of course also use field growing to help thicken the girth of branches which will form part of the design, however these are not suitable so need to be removed.
Use a sharp pull saw such as the medium sized ARS saw which will rapidly cut through the thickest of branches in little time, leaving a clean, crisp cut. The ARS saw also has a catch which prevent the saw from accidentally closing on your fingers when you are working with it. The teeth are also easy to clean after use.
Leave stubs behind from branches which might be used later so that you can further reduce them when you have the tree at a more convenient height. These initial cuts are best done now while the tree is firmly in the ground as considerable force may sometimes be required to remove large branches. Final shaping of cuts can be done later when it's easier to work on the tree.
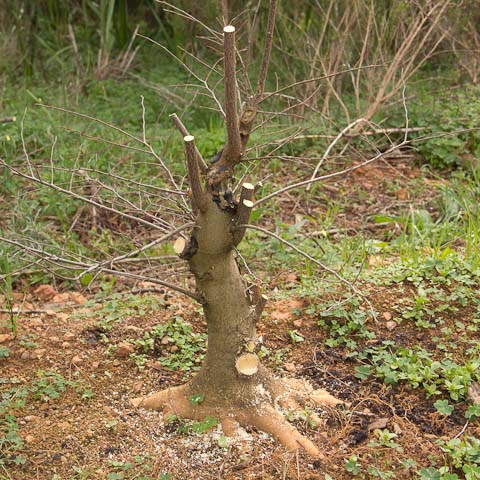
Image caption. Branches removed or reduced to stubs.
Step 2 - digging out

Image caption. Begin digging a fair distance away from the trunk
The clay soil in which these trees are growing is rather stoney. To make it a little easier I use a "ladies spade" as its smaller and easier for me to work with. A small pick or other implement would most likely work even better, but I did not have one at my disposal.
Dig a ring around the tree which will ensure that you have a fair volume of root remaining on the tree. This can be reduced further of course but it is important that you don't chop them too short to begin with as digging essentially blindly in the soil will result in roots being damaged and you need clean cuts to promote healing and reduce the risk of roots rotting.
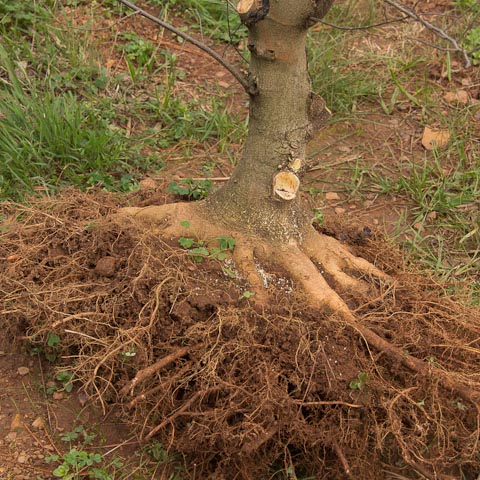
Image caption. The tree removed from the ground.
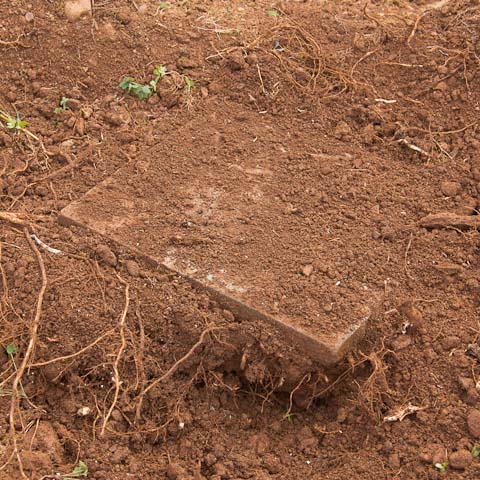
Image caption. The tile which was beneath the tree.
I always use tiles to grow these trees on as it forces the roots to develop horizontally and then down into the ground, instead of immediately down. This has the following advantages:
- The trunk flare is enhanced.
- Increase in the girth of the tree is that much quicker.
- It makes removing the tree from the ground MUCH easier.
I use a slate tile as I find them to last for many years. I imagine you can use whatever you like though, so long as it is flat and is large enough to force the roots to grow horizontally and then down.
Step 3 - keeping it moist
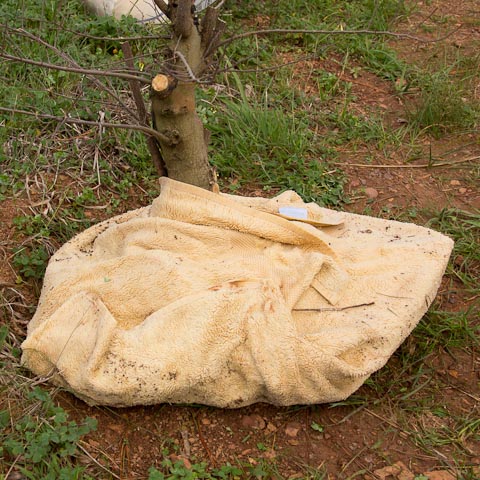
Image caption. The root ball wrapped in a moist bath sheet
It is important, especially if you are working on a hot day where the roots can rapidly dry out, to keep the rootball moist.
For the job you can use whatever you prefer. I have these old bath sheets (very large and thick towels) which I use as they hold a lot of water and can keep a tree moist for hours.
Step 4 - removing field soil
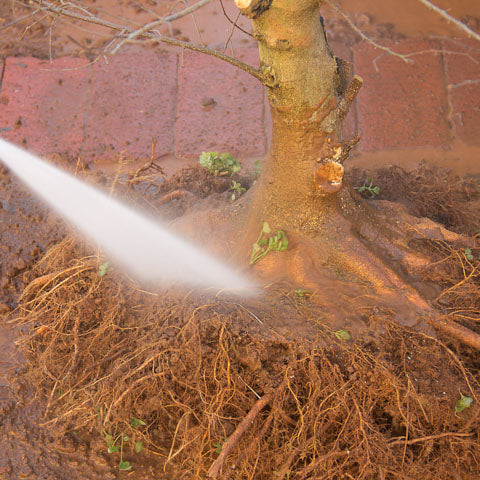
Image caption. The tree getting a good wash
Clay soil, as most other soils you will find in the field, are not suitable to the long term health of bonsai trees. They are either too fine and clog up your drainage, or are too wet such as this clay and retain too much moisture. So it is best to remove all traces of it.
I accomplish this task with a pressure sprayer. Not the industrial ones of course, just the ones which are sold for domestic use and which you would normally use to wash your car. If you don't have a pressure sprayer you can use a garden hose with an appropriate attachment.
Another benefit of washing the roots this thoroughly is that you get rid of all stones which can do considerable damage to your tools when you begin shortening the roots.
As I normally use a chainsaw to do the bulk of the work when developing field grown trees, stones are definitely not desirable as they immediately blunten the chain.
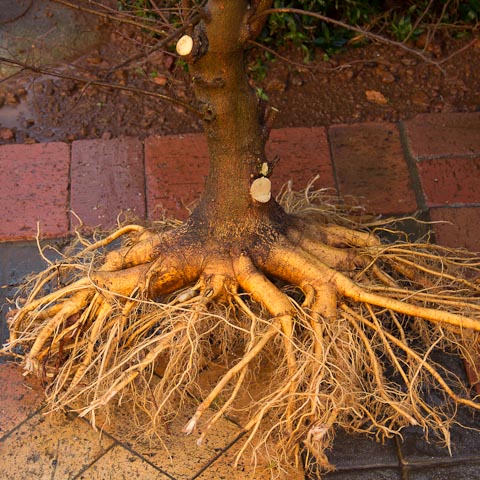
Image caption. Ah, nice and squeaky clean!
Step 5 - a water bath

Image caption. After a shower the tree likes nothing more than a good soak.
As I will only continue the work of this tree in a few days, during my presentation I will keep it immersed in a tub of water.
This is very much the same as you might do with your collected trees. Although you might add all sorts of concoctions to the water in an effort to ensure the surivival of the tree I have found this to be unnecessary with Hackberry and Tridents, although it can certainly not do any harm so by all means go ahead and use your secret muti if you prefer.
Potting it up
Step 6 - preparing your container
Image caption. A wooden box prepared for the tree.
In preparation for digging these trees up I visited the local wood supply store and purchased some rough planed pine which has been treated with wood preservative. I also purchased some stainless steel screws for the building of the boxes.
I must say that in all my visits to Japan, I have never seen a plastic tub being used for bonsai. I confess that I have never asked why this is so but I have arrived at the following conclusions which are my reasons for using wood rather than plastic:
- Wood has better insulative properties than plastic and therefore transfers heat to the growing medium inside at a slower pace. So the trees roots are not exposed to such rapid temperature fluctuations. Thats got to be good right?
- In our sun in South Africa, even a UV stabilized plastic tub is going to last at best 2 or so seasons before it begins to become brittle and break apart. Wood will last many more seasons and it biodegradable.
- I sometimes have to move my trees around due to the movement of the sun, or more specifically the shadows at my house. Wood has a good, rigid structure which plastic doesn't and thus damage to the tender new roots if a plastic tub is moved is almost guaranteed.
- When shopping for a plastic tub you need to take pretty much whatever you can find. If you have the necessary tools you can build your own boxes to sizes or at least ratios which are similar to bonsai pots. This makes things a lot easier when it comes to transferring the tree to a ceramic container.
- I am able to make a box like this cheaper than you can purchase the equivalent size plastic tub at, so there is a financial incentive too.
Wooden Box Construction Tip
If you decide to build your own wooden boxes, allow a small gap of no more than 5mm between the bottom strips of wood although this can be wider if you're using a coarse drainage layer at the bottom. This will allow water to drain out but will be small enough that your growing media will not escape - you will not need to drill holes or use drainage mesh either.
Step 7 - working the roots
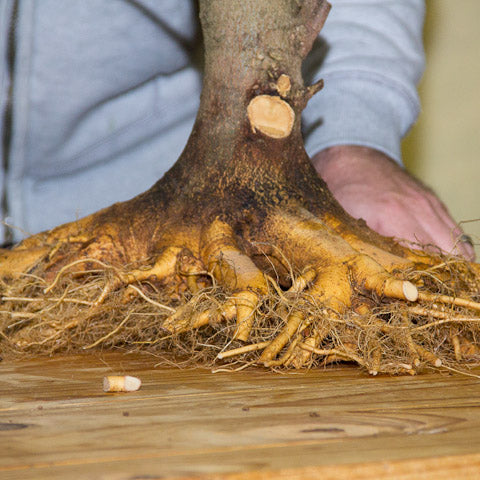
Image caption. The completed root ball
Roots need to ramify just as branches do. This ramification ensures that you encourage a fine network of roots which can support a fine network of branches above.
Thick, storage roots therefore have no place in a bonsai pot and should be reduced. The angle of the cut whether facing down or facing up is not all that critical in my experience, but it does appear that cuts made where the face of the cut faces down is best. However it's not always possible to cut roots in this manner.
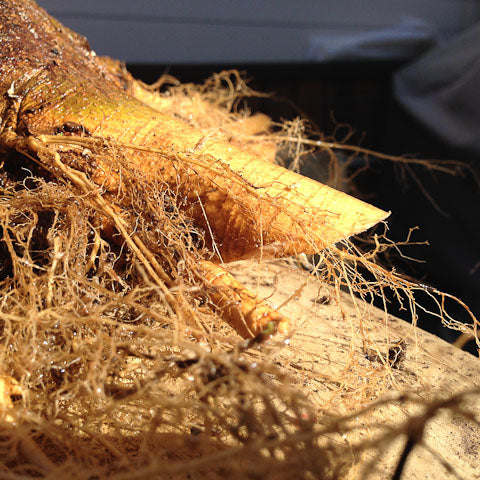
Image caption. An example of a root which has been pruned with the cut facing down. New roots should issue from around the edge of the cambium.
I don't seal my root cuts although sealing the surface ones probably would be best especially as a means to encourage them healing over quicker and leaving less of a scar. In subsequent repotting, should to see roots rotting it is important to remove the rotten material and make fresh cuts to stimulate healing over. {I would recommend using the putty form of sealer as this will not be dislodged easily or washed away. There is one for conifers which has added hormones to accelerate healing, and the one for deciduous.}
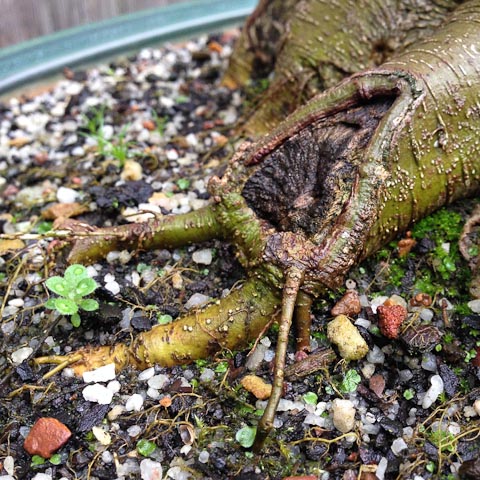
Image caption. In this example, this root was pruned a few years ago and two new roots were developed. The cut should now be cleaned out and sealing putty used to cover the wood and to encourage healing.
Its a good idea to root prune so that the tree can stand at its planting angle, on a flat surface unsupported. This is an approach which should be continued all through the life of the tree as a bonsai of course considering as it fits into a flat bottomed ceramic bonsai pot.
Step 8 - cutting branches and sealing wounds
Branches which are not going to be used as part of the final design should be eliminated and finished off so they will heal over.
It is best to do this work prior to placing the tree into the prepared wooden box, as the work is likely to upset the position of the tree. I prefer to therefore do the bulk of the work before potting the tree, and doing the final finishing later.
In my opinion, the humble root cutter is the most useful tool when working on trees at this stage of development. A saw can rapidly remove the length of the branch but there is nothing like an appropriately sized root cutter to reduce the stub further. It is also far more robust than a branch cutter, as it is actually designed to remove roots. The leverage provided by the lengths of the handles of the branch cutter also prevent you from tiring too quickly when making a lot of cuts.
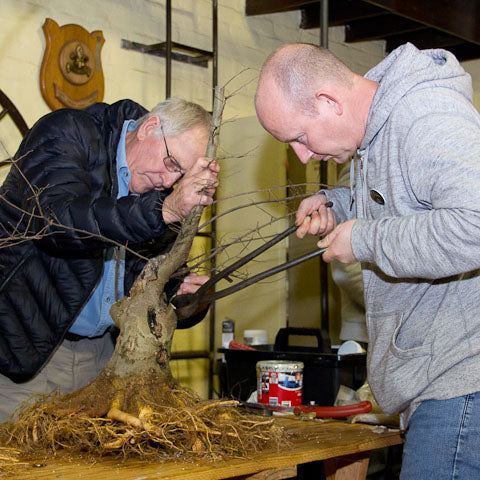
Image caption. Hennie Nel lending a helping hand as I reduce some branch stubs
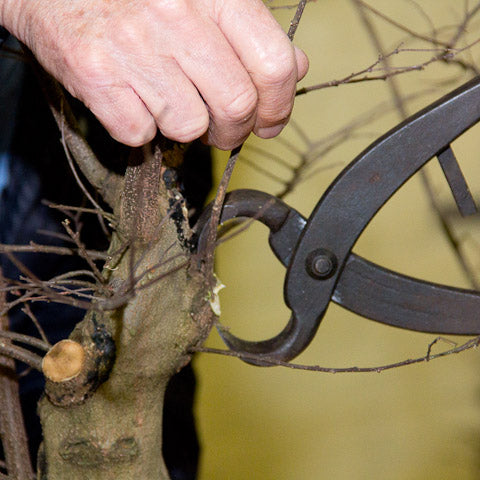
Image caption. Be sure to keep branches above the cuts which will help heal over the resulting scars.
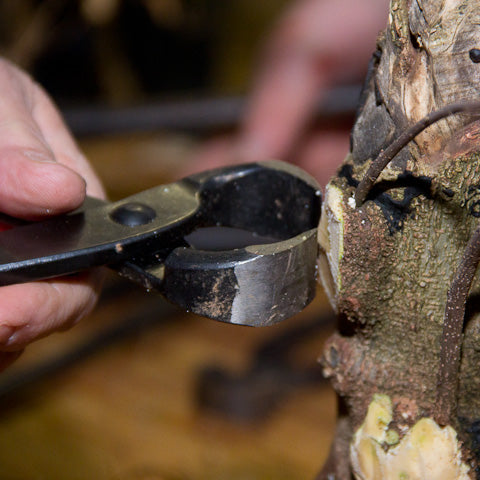
Image caption. Root cutters are not only for roots. They are extremely useful to shaping the cuts of removed branches.
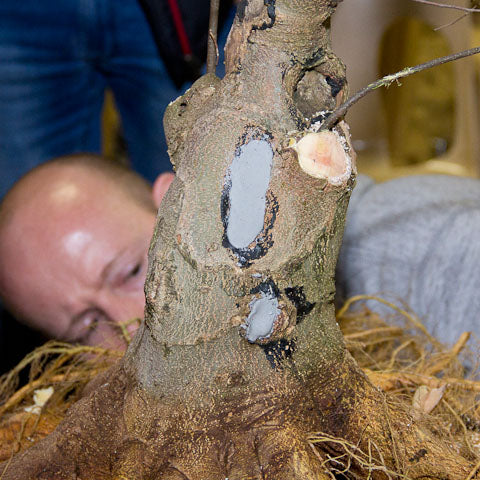
Image caption. Rockset can be used to fill deep cavities.
When you have scars which are largely healed over in the field, they tend to do so very energetically and the live cambium can be quite thick. This can sometime leave deep cavities, which unless development of the tree is continued in the ground is unlikely to close up, ever.
In cases like this you can use Rockset or any other permanent filler paste or mix which will fill the cavity and rather than the tree having to fill it with cambium, it now simply has to heal over the filler. This is likely to happen very much quicker than the alternative.
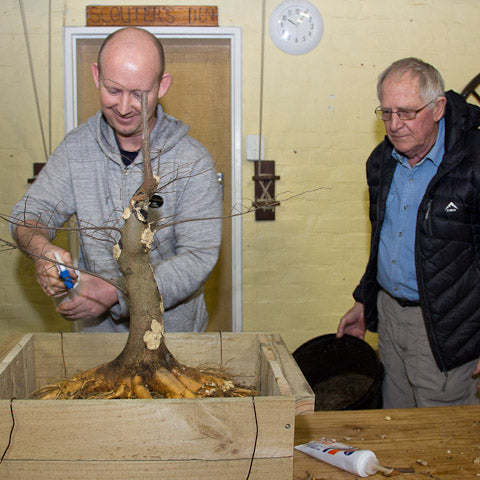
Image caption. While working on your trees ensure the roots are kept slightly moist. Use a spray bottle to mist them (ensure this bottle was not used previously to apply chemicals)
For sealing cuts in general I would recommend the use of the putty type of sealer. It can be formed in your hand and applied to the cut. As the cambium heals over the scar beneath the putty it displaces it. For smaller cuts the paste type of sealer is ideal, simple to apply and very effective on all species of bonsai.
Cuts should be hollowed slightly if you want a smooth wound or if you leave a slight raised area, once healed over this surface undulation could actually add interest to the trunk.
Edges of the cut should be as clean as possible, so going over the edges of a cut after you have finished with a branch or root cutter with a grafting knife is good practise.
Step 9 - securing the tree
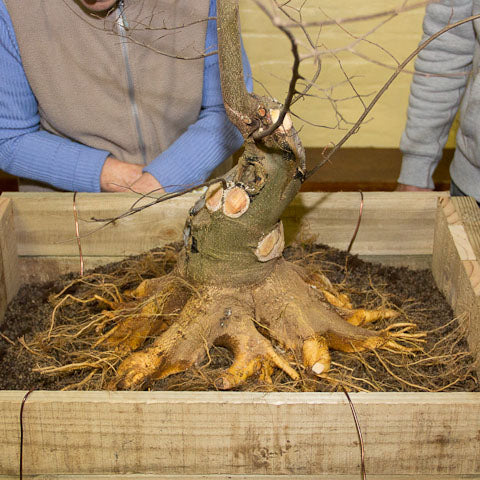
Image caption. Trees should be wired into the wooden box
It never ceases to amaze me how many trees I see which are not wired into their pots. This is not something which I do for kicks, there are very good reasons for this. Here are a couple:
- Wired trees are stable in their container and if they are handled in any way the new growing medium is not disturbed as is the case of trees not wired.
- When moving a tree around, even if its from your workbench to your growing area they can easily be bumped and if unwired you may have to repeat the whole potting procedure.
- I live in a windy area. Wind can easily dislodge a freshly potted tree and at the very least break fresh roots. It can be the case that the latter occurs but the effect is not visible above ground until the trees health begins to deteriorate.
I use aluminium wire for securing my trees as it does not rust. You can also use copper wire if you prefer and this is of course much stronger. What is important is that when you tighten the wire, the action is pull and then twist with a pliers. Not pulling and twisting at the same time. If you do the latter the wire is likely to snap.
Step 10 - adding your growing medium
This blog is not about growing mediums, which is another subject all of its own however I guess it is pertinent to mention something on the topic as part of this post.
In the beginning stages of a tree, such as these two trees currently find themselves, rapid development is required. Thus a medium which is light, fast draining tending to be on the dry side is ideal. As a tree becomes more mature you want less rampant growth in favour of controlled growth. Your growing medium needs to be altered at that time to one which tends to be more moisture retentive although maintaining good drainage.
For collected or field grown trees which are just starting out life in a container I am using a mix which is very fast draining, has good oxygen exchange and just the right amount of moisture retention that I do not have to quit my day job to become a professional waterer! The Professional Mix which contains 30% long fibred peat and 70% LECA is ideal. You might even wish to add more LECA to it, especially if you live in an area of high rainfall.
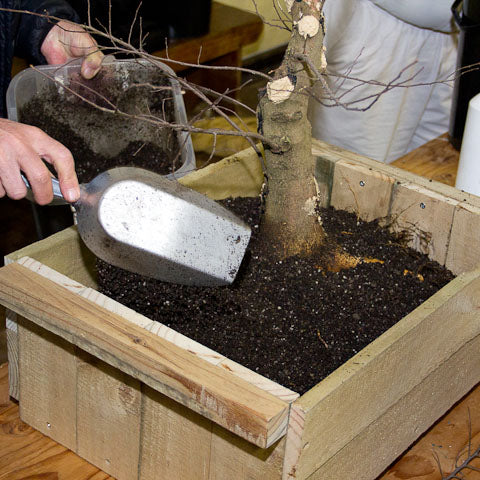
Image caption. Adding growing medium to the wooden box.
When adding your chosen medium to the container you're using, you can use a coarser grade of material at the bottom for drainage. In this case I could have used a coarser grade of LECA or I could have used 6mm stone chip. I prefer not to use stone though as it makes the containers extremely heavy.
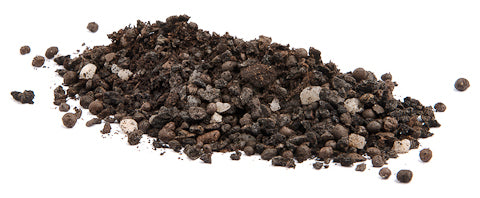
Image caption. The Professional Bonsai Mix is the ideal growing medium to use to encourage good, fibrous root development.
There is a nice set of soil scoops in stainless steel now available and these are ideal for making short work of getting your medium into the container, without messing.
In a month or so I will be receiving my first shipment of pumice though and this would have been ideal now. I will be receiving not only pumice but akadama as well, and both of these will be available through this site.
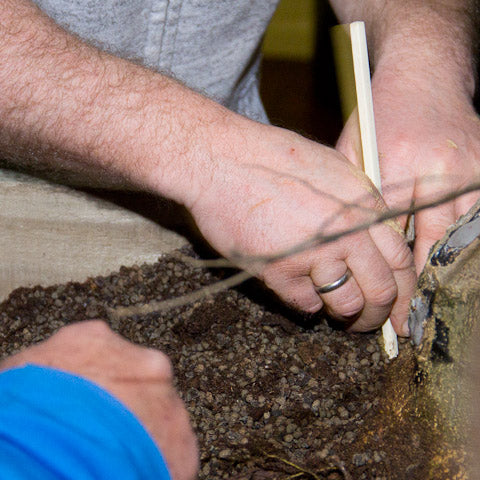
Image caption. Working the growing medium into the roots.
Don't forget to ensure there are no gaps in the root ball. You can use a chopstick or other blunt implement. Make swirling movements with your hand and the medium will sink into the space created. Keep doing this until you are sure that you have eliminated any pockets.
To be sure, you can dunk the entire planting into a basin of water but this is not always practical, especially in this case. Most modern soil-less growing mediums will simply float out of the pot, so it is better to water the planting thoroughly with a fine spray.
Step 11 - watering
After you have initially watered the tree well, just after potting you are unlikely to need to water for at least several days. At this stage the tree is not going to require much water as there is no foliage neither are there really many roots to take up the moisture anyways.
For now the idea would simply be to ensure the growing medium remains slightly moist as this will encourage the development of new roots.
As the tree develops and begins actively growing you will need to adjust your watering accordingly.
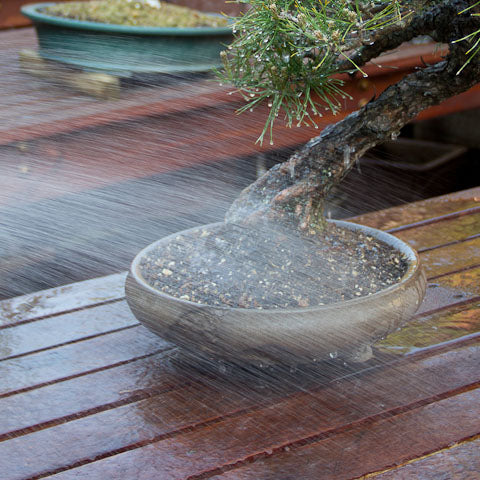
Image caption. Using a watering wand which delivers a fine spray will prevent your growing medium eroding from the container.
It is also best to use a watering wand which will deliver a fine spray of water to your bonsai, which will not erode the growing medium from the pot. {I have currently 2 types on offer} Also, the action of watering is a side to side motion, you do not keep the spray directed to the bonsai all the time.
Aftercare
Aside from watering there are a couple other considerations for the aftercare of your newly potted field grown tree.
Position
It is best to place your tree in a protected position which is sheltered from wind and where it will receive dappled shade or morning sun only. The tree is not yet stable in its pot, and although wired in, wind can still have a debilitating effect on the trees growth. As there are precious few roots to provide moisture to the tree you need to ensure that the tree does not get exposed to too much sun which will dehydrate the tree faster than it can replenish the moisture which is lost. As the tree pushes out more roots it will also push out more vegetative growth, although don't be fooled by the initial growth of the tree which is fueled by sap which was made available to the tree by the growth which you have most likely now cut off.
Fertilizing
For the reasons mentioned above ie. lack of roots and active growth, your tree will not need fertilizer for the first few weeks at least. Any fertilizer applied at this stage will only be wasted. Instead wait until you can see that the tree has settled and is growing healthily (about 4 weeks after initially potting it) and then begin to feed lightly. BonsaiBoost is a fertilizer which is organic and thus cannot burn tender new roots. You can also add more and more sachets around the tree as it shows signs of progressively stronger growth.
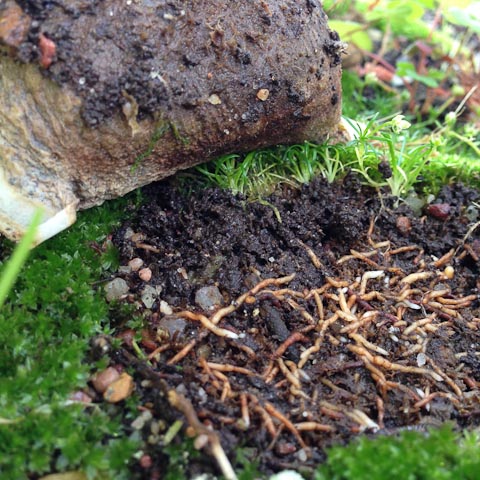
Image caption. Healthy root development being fed from a sachet of BonsaiBoost above.
The future
In future blogs I hope to revisit these two trees and share with you their progress as bonsai. For now the goal will be to establish them in their new containers and encourage a lot of new branches from which I can choose which to keep for the initial framework. I am unlikely to put either of these trees back into the ground. However if I were, a year or two spent in these containers will encourage a mass of fine roots near the trunk after which the trees could be transferred to the ground for another couple years until they would be lifted for the last time.
A special thanks to the members of Oyama Bonsai Kai for their assistance in particular Cindy Rodkin (photography), Brett Simon (assistant) and Hennie Nel (assistant). Your help was most appreciated.
Check out my Youtube channel for more information!
16 Responses


Leave a comment
Comments will be approved before showing up.

August Day
March 28, 2023
Sorry, I just don’t see wasting the time trying to create bonsai from these trees. The one you are showing is old, and has a nice big buttress and trunk, but that’s where it stops IMO. The tree will be full of huge unsightly scars and never have and barking. I have collected a number of these but have given most away. I still have several, but don’t know why.