


Orchids


Japanese Red Pine bonsai gets a new look
Background
In November of 2015 one of the trees I imported from Japan was this Japanese Red Pine or Akamatsu. I cannot recall at the time what attracted me to the tree as in retrospect it is not exactly the most attractive of trees. Its my guess that I must have seen some potential in the tree and the more abstract nature of it. Although I appreciate the timeless beauty and do own several formal and informal pines, they do not hold my attention as long as trees in the bunjingi style do. Trees in this style tend to possess more energy and are certainly more expressive.
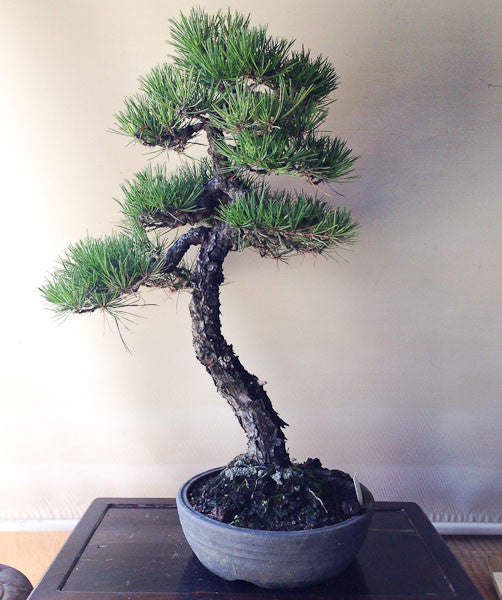
Image caption. The tree as purchased. In fact this photo was taken before I had imported it.
As with all trees which I import from Japan, I allowed it to become acclimatized, something which usually takes most species about a season to do. To work on pines requires that the appropriate work be done at the correct time. So although the tree may be healthy, before beginning to work on it in earnest it is best to wait until its timing is on. This is why I waited 2 years before performing the restyling exercise which I will now proceed to discuss with you.
Preparatory work
Work on the tree sort of began the following season on the tree, so back in 2016. What was done was really light work though, nothing too intense. At the time I completed the following:
1. Removed all old copper wire
Copper wire develops a great colour when it oxidizes, it essentially ends up as a very dark brown or even black. It is therefore less visible, however this of course means that it is easier to overlook some wire when removing it, resulting in some serious wire bite. A lot of people ask me when wire should be removed from pines. The answer is not as simple as they would like as it will depend on how fast your tree is growing. As wiring is typically done in winter, the growing season is ahead and in young trees on new branches you will start getting wire bite in a matter of weeks. In older trees it could be longer of course as they are not growing as fast anymore. What I essentially look out for is wire bite. When the wire begins biting in, then I remove the wire but not before. Remove the wire too quickly and the branch will return back to its original position and you will have to re-wire it the following season. From an environmental perspective, when removing copper wire, please do not just throw it in with other green clippings. Rather put it into a container which you can take to your local scrap dealer. Its less about the recyclable value and more about doing the green thing.
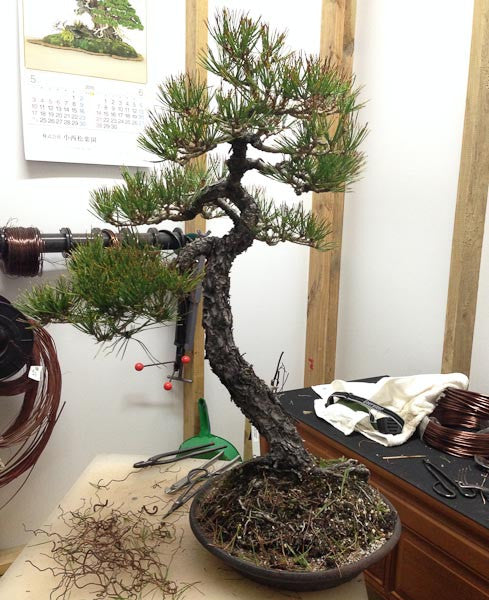
Image caption. Removing the old copper wire, by cutting it off using the appropriate wire cutter.
2. Changed the pot
The training pot which the tree was in was just that, a training pot. However I felt that at this stage the tree could go into something a little nicer, like a more free-formed nanban type container. I particularly liked the more open feel of the nanban which seemed to visually extend the surface of the root ball. The training pot's vertical sides brought the composition to an abrupt end.
I subsequently decided that the container was not right for the current stage of the trees development. The harsh growing conditions the tree will experience in such a shallow, open container will greatly retard its growth. So I decided to rather put it into a Japanese tokonameware drum style container which would provide more volume for the roots to develop in, and as it is deeper water retention would be better.
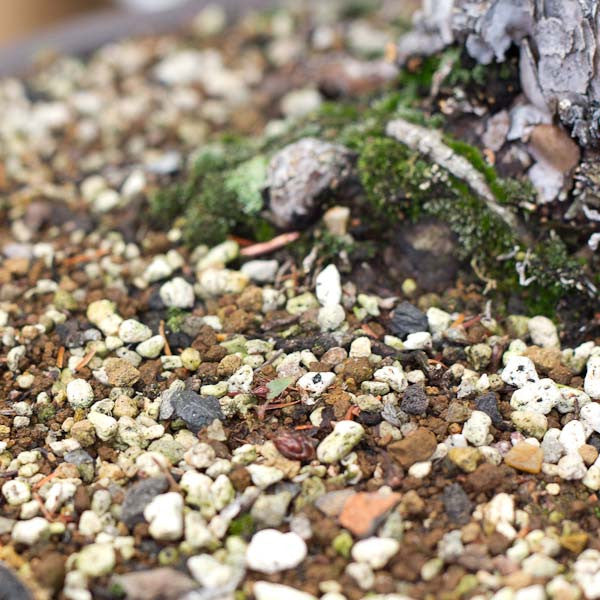
Image caption. New growing medium of Akadama, pumice and Leca. Charcoal was also added.
With bonsai it is often about planning. Pines are no exception. Realizing that I would not be able to repot the tree and decandle in the same season, repotting had to be considered now. The growing medium the tree was in when imported was mainly akadama and pumice; however the akadama had largely broken down retarding drainage and increasing water retention. Both these factors combined resulted in slowing down the growth of the tree, another reason why repotting would be a good idea before doing a major restyle. When you repot a tree it is revitalized and this would be a good condition for the tree to be in when I began working on it. So I proceeded to remove the old soil from the root ball and replaced it with new growing medium. I used a roughly 1:1 mix of fine akadama and fine pumice. I added charcoal too, about a large scoop.
3. Removed old needles
I removed all the old needles with tweezers. These old needles essentially block sunlight from getting to the inner buds, they harbor pests which make their nests within the clutter and as they are now a few seasons old, they do not serve the tree in any way as food factories. I left around 10 pairs of needles at each tip, slightly less in the apex as its the strongest area of the tree. This reduction of needles before spring determines where the sap flows and just how strong the candle development is. Fewer needles = weaker candles. This is important to understand if you want to avoid coarse growth when refining a tree. In contrast when you are developing a tree you want lots of needles.
Where three buds or branch-lets emerged from the same area, one was removed to avoid swelling.
4. Fertilized
Pines must be healthy before you can think of working on them. This is really no different to any other tree though. So right through the season, I fertilized well with BonsaiBoost, replacing the bags monthly. For a much more indepth look at fertilizing please read this blog post
Styling the tree
Trunk
After completing the work described above the tree was wired with new copper wire. I chose copper wire because every branch would need to be wired and if using aluminium wire you would probably not have seen any branches, just wire. Copper wire also allows you to use at least half the thickness of aluminium as due to its superior strength, produced by work hardening thus holding the springy branches best.

Image caption. The flaky bark of this Japanese red pine which will eventually become more and more plated with age.
I decided against any radical trunk bends, opting rather to remain with the fairly gentle curves already in the trunk. I did however rotate the tree a bit so as to emphasize the broader root base.
Main branch | Sashi-eda
As mentioned in previous posts, the main or largest branch is not necessarily the first on the trunk from the base up, however in this case it was. Its an important branch as it provides the blueprint so to speak for the rest of the branches and thus contributes largely to the style of the tree. Before I started, this branch was essentially one large tangled pad. I decided to give it definition I would split it into three, giving each some definition. As a result this also produces some additional volume when the tree is viewed from the front.

Image caption. The main branch was given definition and volume by splitting this large pad into three.
One of the things I learnt in Japan, or at least my understanding or interpretation thereof is that sometimes when we restyle trees the result immediately after the styling might not be great from all angles but that when viewed from the front it is pleasing. In time the flaws or shortcomings are eroded and the quality of the tree is improved all round.
As you can see from the following photo, the pad when viewed from the side is not that full, however you don't see this from the front. Red pines, when healthy and fertilized correctly will produce a good amount of adventitious budding further back along the branches. These buds will be developed further and used to fill in some of the more bare areas.

Image caption. The same main branch when viewed from the left side.
All the branch-lets which make up the pads are terminated with a slightly upward tilt. {Another reason why you cannot take any shortcuts when wiring, you need to wire right to the tip} The reason for this is at least two-fold. Firstly it positions the needles in such a way that they are directed towards the sun and thus will work harder for the tree. Secondly it looks much more aesthetically pleasing that a foliage pad with needles growing in every which way.

Image caption. Wire terminates right at the tip of the branch to enable you to give a slightly upward tilt.
Back Branch | Ura-eda
The back and front branches on a bonsai tree are so important as they provide depth or a third dimension to a tree. Trees without them appear flat or shallow.
Fortunately there was a great branch already more or less in the position I needed, the only problem was that it grew out of the trunk in a very horizontal fashion. The visible section of the branch was also very straight. As mentioned before, the main branch provides a blueprint for the remaining branches so as that branch had a very downward angle, this branch would look strange if it remained very horizontal, plus it would cause problems as we work further up into the canopy. So it needed to be brought down.
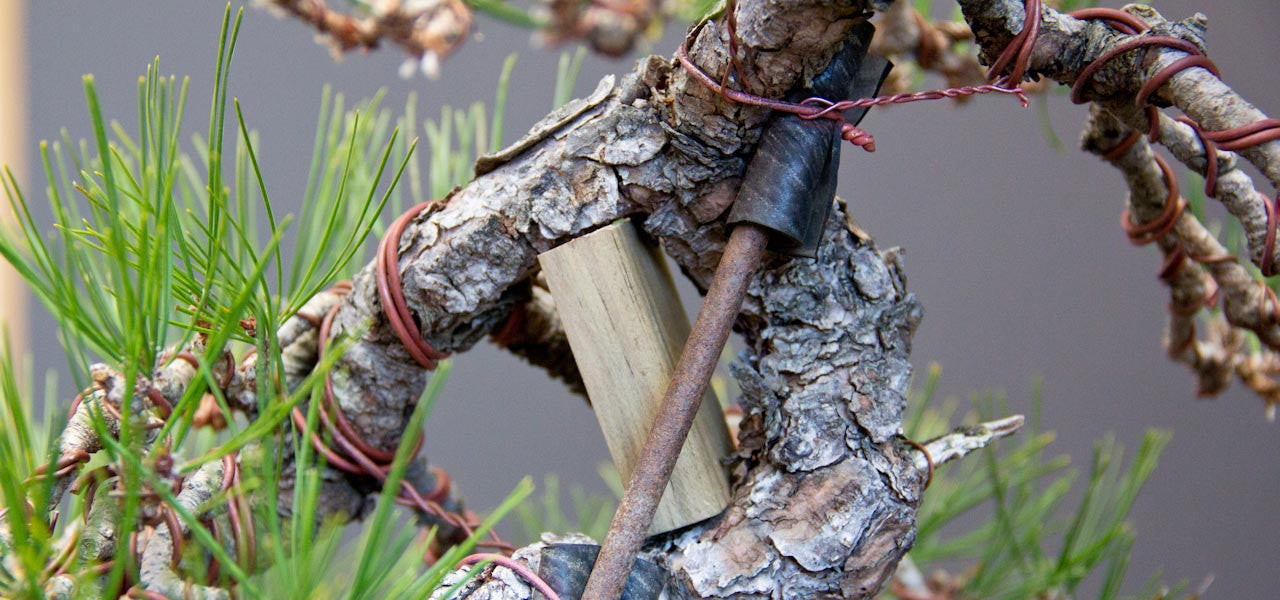
Instead of just bending the entire branch down it occurred to me that I could divide the first section of the branch up and with the use of a wedge only bend a section. This would achieve two things; provide some character to the branch and achieve the desired downward angle.

Image caption. Block of wood inserted prior to bending the back branch.
I accomplished the bend with the use of a wooden block which was cut to size and fitted between the trunk and back branch. Using a branch jack I was able to control the bend very easily by tightening the jack. Once the desired bend was achieved I used copper wire to create a stay, anchoring it to the branch and a screw which I had threaded into the reverse side of the trunk. The jack could then safely be removed and the branch would remain in the bent position.
By moving the pivot point, where the bend would occur, away from the trunk and supporting the beginning of the branch with the wooden block I reduced the risk that the branch would tear or break from the trunk. No raffia was needed as the bend was not so severe and I did not want a layer of raffia to impair me from seeing the bend and when/if the branch began to tear.
Apex | Jushin
Some people find developing the canopy of a bonsai tree challenging. To me I think it is actually the easier part, the main branch and trunk being probably the most challenging.
Given the species, a Japanese red pine, and the chosen style for the tree, a rounded canopy is desirable. However trees in the literati style should not appear too lush. They should mirror their suggested surroundings and project a more sparse image. So the challenge is positioning the available branches in such a way that they fill the canopy, giving it volume and where necessary reducing the number to avoid it appearing too full and lastly to provide the overall rounded silhouette of the tree with nothing protruding in a jarring manner from this {although this is a "rule" made to be broken}.

Image caption. The rounded canopy of the apex.
Some slightly more demanding work was also required on the section of trunk in the apical part of the tree. You will recall that before I started working on the tree the apex was very straight. To provide more interest and movement to the tree I needed to move the apex over to the right. Although one can accomplish this with thick wire, to me it is unnecessary as wire stays work just as well to achieve the job. The upside to the stay is that you do not have to struggle to get thick wire into the canopy and stand the chance of damaging some of the smaller branches. A piece of rebar, anchored to the tree at strategic points is very easily done. The image which depicts the anchoring of the rebar can be seen a little further up in this post. Once again, the branch jack can be used to slowly create the bend, however in this case I was able to use my hand and once again employed a stay to secure the bend.

Image caption. A birds eye view of the completed tree.
I never used to look at a tree after styling it from the top until I began studying in Japan. I now find it invaluable as it quickly reveals where the "holes" in the tree is. It is especially useful to see where the volume of the tree is; whether you have too little at the back or too much in the front. You can then take steps to rectify the problems.
Final Result
I hesitate to use the word "final" but I think you will understand that what I mean is that for this day of styling, this is where I left off. We all know that a tree is a piece of art which will always be evolving and never reach a state of completion.
In light of this fact I am happy with the result of the work done, and at the very least the tree looks better than it did when I began.
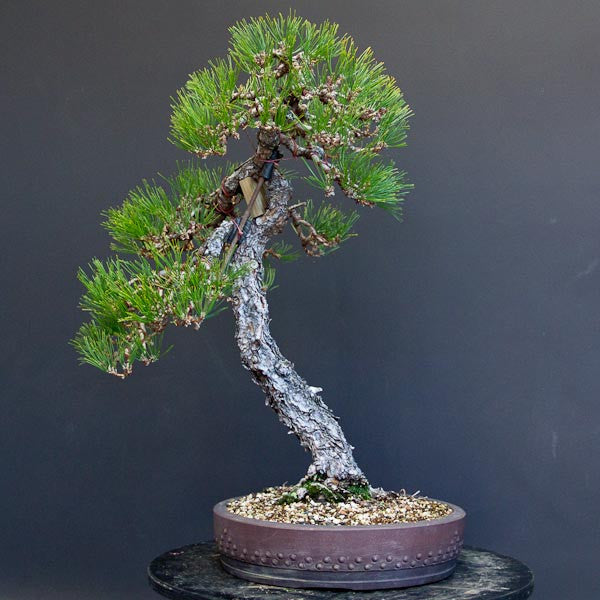
Image caption. The new front, slightly turned from before.

Image caption. Right view.

Image caption. The back.

Image caption. The left view.
So what's next you might ask?
As I mentioned earlier, being a literati styled pine one has to be cautious to permit it to become too lush in appearance. I do not mean that the tree should look weak, I just mean that it should not be too densely ramified. Over time with decandling, the ramification increases exponentially. It is very hard to do because most of the time we are trying to build this up, but you actually need to reduce the number of branches so the structure of the tree is quite open.
What I would like to do is to encourage some adventitious buds to develop and use them to replace existing branches which were allowed to become too coarse by the previous owner. To accomplish this will take all my combined skill and understanding of fertilizing, watering and needle plucking.
Aftercare
As this tree has undergone quite an ordeal we will now let it rest. This sort of work is best done on conifers during the dormant months as there is little chance of the active cambium separating from the wood beneath, as sap-flow is very slow. At this time we are also not fertilizing conifers so we are not putting any additional stress on the tree to grow. For now it can rest before the buds will begin to develop in early spring, and it will be best placed in as much sun as possible. Watering is really only required when the growing medium is fairly dry, and as the tree is not losing much moisture now this is unlikely to be on a daily basis. As soon as the daytime temperatures increase I will spray the tree, along with all my other trees, with a concentrated solution of lime sulphur to prevent over wintering pests from making it through to spring.
The wire which was applied will most likely stay on for at least a few months, and possible even a season. When it begins to show signs of biting in then I will cut it off. Removing it too soon will mean I wasted my time and wire, however too late and it will take a few seasons at least for the marks left behind to disappear.
Well that's it, hope you enjoyed reading the post.
1 Response
Leave a comment
Comments will be approved before showing up.

Mark Langston
July 11, 2017
I have always wanted to attempt a Japanese Black Pine. where can I find one, and what would the cost be. I love working with my trees and experimenting with options. Living in Adelaide in the Eastern Cape, and struggle with extreme temperatures. Thank you for the blog really enjoy your newsletters. God bless