


Orchids


Root over Rock Chinese Maple: A critical analysis
Overview
Some time ago I mentioned that I would like to take a closer look at this incredible trident maple growing on a rock. It was at Taikan-ten in Kyoto last year where I saw it and it quickly became one of my favourite trees on the show. It is an excellent example of the root over rock style and displays what level of refinement or 'ramification' is possible with these trees if you understand the techniques required.
Initial Viewing
It is my opinion that Trident Maples, as with pretty much most deciduous, are best viewed when they have no leaves on. With leaves I am sure this tree will also look spectacular, especially in autumn when it no doubt has wonderful autumn colours, but it is when the tree is bare that we can truly see this trees structure and the artistry and mastery of technique possessed by the artist or artists who created it.

Elements of Art
Looking at this tree our eyes are seeing many 'devices' or elements which are very familiar to any artist or persons involved with creative professions or activities. These devices may also be referred to as 'elements of art.' The main ones include form, shape, line, color, value, space and texture. Whether you were aware of it or not, when you styled a bonsai tree you were using these elements. You will also find that the trees with which you were most pleased combined these elements well.
As I will need to refer to these elements in the course of analysing this tree it is important to understand what is meant by them and I can assure you that with a good understanding of them you will design better trees.
Form
Form essentially refers to an artworks shape but as our eyes see in 3D it also refers to volume or the perception of volume. In 2D art such as sketching, painting and other work done on a flat surface the illusion of depth is created through shading or using tonal variations of colour {light to dark}, to suggest three dimensionality.
Bonsai is a 3D art form and thus unlike 2D art it does not only have a length and a width but it also possesses depth (Ever looked at a bonsai tree without a back branch or much foliage towards the back of the tree? Looked pretty flat right?).
Line
This element or artistic device refers to the graphical element which joins two points. In car design we might exclaim; "Look at the beautiful lines of that car!" Sometimes this line is not a visible line but one which is implied and which our eyes create of their own. Google Picasso's sketches and you will see a master of implied line. Lines of course to be visible must have a thickness, they will have a beginning and an end and they will be orientated at a particular angle.
So perhaps we could use the term 'line' when we refer to ramification. For example; "Check out the lines on that maple!" Seriously though, line is very important in bonsai design as it refers to the fundamental flow and direction of the trunk and branches, each having a thickness and direction.
Color
As you might already know white light contains all the colours of the spectrum and black is the lack of colour. Colour which we see with our eyes is actually what is reflected from a surface when light strikes it. When the term hue is used it simply refers to a colour, so in other words the name of a colour such as brown, yellow, green and so on. The term 'intensity' describes how vivid the colour is. If you have ever worked with any kind of photo editing program the term saturation is also used, which is the same as intensity.
The final term used when describing colour is its colour value. Sounds complex but really it just describes how dark or light a colour is. Probably more commonly used terms are 'shades' or 'tints' and these refer to the change in a colours value. When black is added to a colour it produces a different shade of that colour. When white is added it will produce a colour tint.
I make a lot of reference to colour and its many aspects in my article on selecting a bonsai pot, which you can read here.
Space
When we talk about 'space' we are referring to the area which has been used by the artist in some way.
With 2D art this will refer to the foreground of the artwork, the middle ground and the background of course. Furthermore, there are two kinds of space; positive and negative. Quite obviously, positive space describes the space which is used or utilized by something and opposite to that is negative space; so the space which is not used.
It is critically important that you grasp this artistic element, for without doing so your trees are definitely not going to be as exciting as they might have been.
Texture
I am pretty sure we all know what texture means. When as a kid I was forced to wear those horrible jerseys hand knitted by a loving relative or family member, I hated it because of the texture; it scratched me.
Texture, therefore refers to how something feels, the tactile texture, or how you perceive it to feel. You could say you love the texture of a bonsai pot without having ever touched it, but simply by looking at its smoothness or if the artist used rough clay; its roughness and therefore consider this character in the pot when combining it with a tree which also possess similar qualities in the bark, the leaves or something else. Adjectives such as smooth, rough, light, bumpy, flat all refer to texture.
Surface or Ground Cover
There is some debate, at least in South Africa, about a suitable ground cover or covering for the surface of the growing medium. From what I have seen the overwhelming majority of trees I have seen on display locally are surrounded exclusively by stone. The stone used is of various sizes, colours and textures however I wonder what thinking has gone into these choices or in contrast how many times has something been used which is simply available.
If we, through our bonsai are trying to suggest a tree in a landscape somewhere then it stands to reason that how we treat the area around the bonsai cannot just be an afterthought and that it must make sense, or said in a different way; it must assist us in achieving the illusion or mental image we are trying to evoke in the viewer.

Analysis
If we look at our example we can see that lush, green moss covers the entire surface around the tree, but not only one moss has been used. The moss has been carefully placed around the tree and lichen has been mixed into the moss.
If coarser moss were used in the foreground and increasingly finer moss towards the back, we could create a greater illusion of depth since we see objects closer to us as more defined than items in the distance. When using moss we can create interesting textures by using different types of mosses and something like lichen. Although moss is generally green in colour by using different mosses tints will be introduced. As the moss has been applied in small clumps which knit together, the surface is not smooth creating a much more interesting surface with positive and negative shapes created as a result.
Summary
It would be so easy to have a whole discussion about the use of moss, or lack thereof as a ground cover in South Africa at this point, but I am determined to abstain from such, at least in this blog post. What I would like you to reflect on is that regardless of the material you use, whether it be grasses, mosses, gravel or other you need to consider the analysis above.
So for example if you are going to display an Acacia in an African style, moss might not be the best or most appropriate ground cover:
- Instead find a very fine, short growing grass and plant it strategically in your container (Tip! When I have done this I have a couple weeks before a show cut the grass short so the new blades are short and dense. I also plant the grass in small containers within the bonsai pot otherwise the grass may spread everywhere).
- Between the grasses use gravel.
- The size of the gravel particles should be to scale with the tree, or at least as close as you can get it. For instance, do not use 6mm stone chip with a shohin sized tree, scaled up you are suggesting a scene with a tree surrounded by boulders!
- Ensure you have slight colour variations within the gravel.
- Use colours which are natural and appropriate for the habitat or landscape you are trying to suggest. And please DO NOT USE coloured aquarium gravel, it has no business being in a bonsai pot!
- Before you apply the gravel make sure the surface of your growing medium around the tree is not flat, create slight mounds onto which to place the gravel.
- Scatter some larger pieces of gravel around also.
If you overdo things by adding too many elements you will move into the field of saikei (planted landscape). So keep it simple and remember that you need to suggest only enough for the viewer then to form a mental image of their own design, don't dictate it to them.
Nebari and Tachiagari
These are Japanese words which refer to specific areas or sections of a bonsai tree. I have heard it said that we are not Japanese so why do we need to learn Japanese words for use when we discuss bonsai. There is a very simple reason for this; there are to my knowledge no English words which convey the same meaning.
'Nebari' refers to the roots which protrude from the growing medium. When discussing a bonsai, critically, the nebari is a very important consideration as it will sometimes even determine how successful a bonsai has been styled in a classical style or whether it is even to be considered styled in that manner. What I mean to write is that if you have created a broom style tree but all you have is one or two surface roots, rather than roots extending in all directions from the trunk at roughly the same level, then your efforts will be largely negated by this fact. The reason for this is that these 'eight direction' roots, provides stability for the very upright broom style, without them the tree appears to balance precariously.

'Tachiagari' is the length of trunk between the nebari and the lowest or first branch. It is the section of trunk which is the most exposed and thus is easily scrutinized. Its condition, shape, texture and more affect largely the way we perceive a bonsai tree.

Analysis
Certain styles prescribe the ideal appearance of the nebari, in root over rock the roots should firmly clasp the rock and they should not run in straight lines down the rock. When roots clasp the rock firmly, as in this example, they provide visual stability to the tree. The tree appears as though it has grown for many years against it and has taken on the profile and contours of the stone. Of particular enjoyment to me are the creases in the bark where the living tissue has met with an obstructing protrusion from the stone. They dramatically add to the story which this tree tells. As the roots hit the soil they splay outwards, they do not simply disappear into it. Once again this contributes to the illusion of age.
Where roots spread apart, then combine and become fused, interesting negative shapes appear; framed as it were. In this example we see how the roots grew around the protruding piece of stone and then below it once again combine.
The section of the trunk between the roots and first branch is very interesting in the manner in which the lines interplay with the lines of the stone once again creating interesting shapes and outlines which entertain our eyes. Over time the sap flow from the roots to the branches have created swellings; live veins if you like. To me they look like the ripped muscles of a fitness fanatic, and they provide an element of masculinity to this tree and an air of vitality. All these characteristics contribute to the surface texture as our eyes perceive it. The bark of the Trident Maple species has a tendency, when old enough, to peel off, exposing patches of orange hues beneath. When this happens, as in this example, it provides further aesthetic interest as our eyes move along the trunk from the roots and up into the canopy following the trees muscles as they move from left to right, fusing and parting as they flow.
Summary
Nebari
The nebari is always important when creating a bonsai. I have often observed novice artists will seek out trees with 'weird' roots which are coiled, kinked or have some other kind of deformity. Although it is fine to have unique qualities in a tree, all too often the artist is unable to continue with this approach in the rest of the tree and thus it just remains an eyesore and eventually ends up being planted in the ground as a garden tree, given away as a gift or even thrown away as it overpowers everything else which that artist does and is all a viewer sees! When I purchase trees the nebari is the part I study most, if its good then its a big motivator {if I like the rest of the tree of course} to whether I buy it or not. If its bad and will take a lot of effort to fix then I will pass over it. Working with a bonsai with bad nebari is quite pointless in my opinion as the nebari will always be its downfall. I cannot emphasize enough the importance of good nebari.
I en-devour to work on the nebari of my trees every time I repot them. Unlike branches which you can work on pretty much any time, roots are only exposed once every few years when you transplant. So take time to consider and plan what you can do to improve the roots of your trees prior to repotting time so that when the roots are exposed you can implement your plan. This might include doing some grafting to fill in some gaps, it may mean you need to split a heavy root or simply cut and seal a dead root. The most drastic plan of action would be to ground or even air layer the tree to improve the roots, if you are considering this option read this blog post I wrote on the subject.
Tachiagari
This section of trunk, being the most exposed section is very important and should be without visible cuts. If you are field growing (Read more about this here) and you make trunk chops they should be to the back of the tree so when viewed from the front they are not visible, or they will need to be carved. Remember that you are trying to create the illusion of a tree in nature. Stylized or natural; in either approach any visible artificial cuts or scarring will quickly detract and destroy that illusion. There are techniques which enable us to create premature aging of the trunk which result in the tree appearing older than it actually is, use them {with caution} but there really is no substitute for real age.
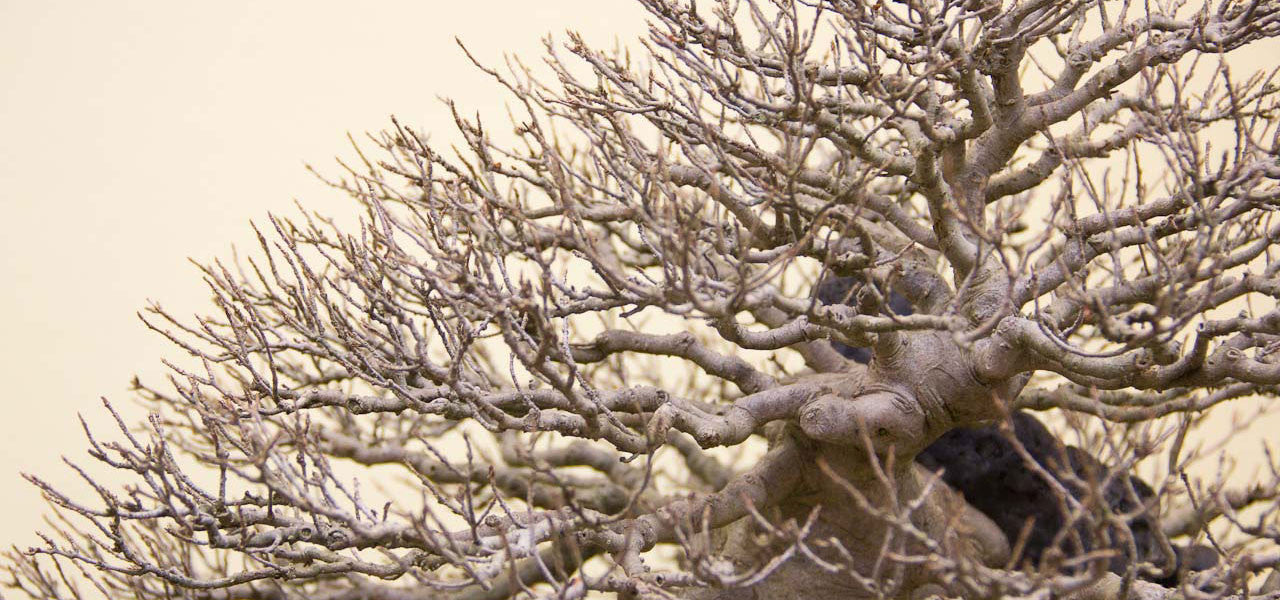
Canopy of the tree
The canopy of the tree refers collectively to the branches and the fine twigs which emerge or grow from the branches.
There is much which can be written about this part of a tree so lets view the images pertaining to this one and discuss some of the most pertinent points of interest in the order that the images appear.
Analysis
As we last looked at an overall image of the tree some time ago, I wanted to re-post it here to both refresh your memory, but also that we may analyse it that much easier.
Question:
In which direction is the tree moving?
Answer:
If you answered from right to left you would be correct.
Question:
Why did you say this?
Answer:
Notice how the apex of the tree is off to the left when you use the trunk and where it enters the ground as your point of reference? Although it is very slight in this example you will usually also find that the volume of the foliage will be on the side opposite side to the direction in which the tree is moving. This provides balance. It is also on the side of the main branch.
Question:
Which is the main branch you ask?
Answer:
The main branch (in Japanese referred to as "Sashi-eda") is the one which is a little ways up the trunk, growing to the left. This is THE most important branch of any bonsai because it defines the tree ie the style, the feeling and so forth. It is also the largest branch of the tree.
So where do bonsai by numbers; first branch being a left or right branch, then a back branch followed by a branch opposite to the first fit in you may ask? Simple, IT DOESN'T.
Earlier on we spoke about implied line. You will notice there is an implied line which travels around the canopy and forms a soft, roughly triangular shape. I am sure you have heard and perhaps read about the triangle and how it is used in bonsai design. Depending on the style of bonsai which you are creating and the species with which you are working, this triangular form can be fairly sharp and at other times very rounded.
What is also very apparent is the artists use of back branches to create three dimensional volume. Notice the first, back branch on the trunk and how it serves this function superbly. With your finger on the screen, cover this back and look at how this completely alters the tree.
I have seen some trees where the canopy is just one large mass of twigs. Now from a technical point of view its impressive but aesthetically it, in my humble opinion, is not as pleasing as this tree. Why? The use of negative and positive space. In this example our eyes move around the canopy following the implied outline around the branch foliage pads, in and out of the canopy. The level of visual interest is thus far greater; our eyes loving the movement.
Have you noticed the level of ramification in the lower branches compared to the height of the apex? Its denser in the apex than lower down. This not only makes perfect horticultural sense as less light would reach these lower branches than those higher up in the tree but it also provides a sense of perspective. A good example which I am sure you can all relate to is when you stand in front of a tree and view the branches closest to you; they appear larger with larger spacing between them and they are also clearly defined (you can see them in great detail). However branches which are in the uppermost regions of the tree will appear finer and closer together. Of course they are but this is enhanced by distance. By utilizing the device of perspective you can provide further visual cues to the viewer, enhancing the illusion of a giant tree in miniature.

Notice how all the twigs forming the ramification of this tree tend to grow towards the sunlight. Furthermore you will not see any which emerge from the bottom of a branch. In nature and likewise in bonsai such a branch will forever be weak as the sunlight which reaches it will first need to travel through the upper branch-lets until it reaches them. Although through the use of defoliation you can artificially keep such branches alive the effort is not worth it and it is better to use side buds.
I would also like you to notice in this image and many others depicting the branches of this tree, and how they generally sag towards the ground and then at the tips tend to grow upwards. If you look at young trees in nature all branches tend to have upward growth, but in old or ancient trees you will see the lower and therefore oldest branches hang. This greatly contributes to the feeling of age. You can use this device in your trees too; want an old tree? Style the lower branches with slight downward movement. In contrast, if you want a tree which presents a youthful image then have all the branches growing slightly upward.

Ever heard the term herringbone? I am not sure who used it first but I have certainly heard the term being used by Dr Carl Morrow, a South African bonsai artist. It refers to the backbone of a fish which features a single main backbone from which all thinner bones which protect the fishes internal organs grow. It is also a shape or design which features often in bonsai tree branches [unfortunately]. Although it is true that there are a few exceptions in nature, trees generally do not grow in this way. You will note that a main branch will emerge from the trunk, grow a ways and then fork. These two branches grown a bit and then they fork and so on, and so on. This is what we in bonsai collectively refer to as ramification. When you have a branch which relies on a single main branch running down the middle you have several problems:
- You are sooner or later going to run out of space with which to create volume to your foliage pads and twigs are going to be bumping into one another all over the place.
- The branches are going to suffer die-back over winter, as this single branch simply cannot support the number of finer branch-lets in a densely ramified tree.
- To achieve an overall, pleasing silhouette is going to be impossible and instead you will end up with branches with pads that are going to look like little green clouds connected to a tree trunk. I know this from personal experience and I have had plenty of trees which I have had to start over again because of it.
In contrast to the above description please take a look at this specimens branch structure and you will quickly note that there are no single, main branches but instead there is a LOT of splitting or forking happening.

In the preceding images you I am sure saw how that branches near the base of the tree grow in a downward angle (for reasons already described) but then in the apical area they grow at an increasingly more acute angle towards the sun. What is the significance of this?
I remember when I was still young in bonsai and listening to conversations about how difficult it is to style an apex, or that it is basically treated like a miniature informal upright bonsai. Both comments make sense when you style trees with branches and branch pads which are flat, growing horizontally. In such a case then I understand perfectly because you would need to ask yourself what to do when you reach the tip of the tree. However as trees don't actually grow like that, you will find it very simple to position branches if you allow nature to guide you. Stay away from horizontal lines as much as possible as they also make creating volume in the foliage pads very difficult and very easily artificial.

There is no photo of this trees branches which better illustrate the next point and that is in all bonsai, but particularly deciduous trees; you should never be in a rush. This branch has been grown, cut back, grown and cut back multiple times. Not only has it been cut back repeatedly but the initial branch extension or inter-node was also short. This is the result of appropriate amounts of the correct fertilizer applied at the right times. Although the result has taken years to achieve it is far more pleasing that a branch which is grown quickly with large internodes, is devoid of taper and with little change in movement.
Summary
I think I have pretty much covered all the main points related to the canopy needing attention so let me see if I can summarize them neatly, and if you need further detail just revert to the previous paragraphs:
- Movement of the tree (and often the style eg cascade, leaning trunk etc) is defined by the position of the apex relative to where the trunk enters the growing medium.
- The visual mass which makes up the canopy will be to the opposite side of the movement to provide balance.
- The most important branch on any bonsai tree is the one which creates the feeling and style for the rest of the branches and it [always] is found on the same side as the apex.
- Use back branches to create depth.
- To make a tree appear more mature have the lower branches sag.
- Use the device of positive and negative space and create some space between branches and their "pads" however avoid creating artificial looking foliage clouds.
- Ramification should increase from the bottom of the tree to the apex, reflecting the amount of sunlight needed to sustain such density.
- Branches should not resemble a fish backbone, but should rather change direction and fork multiple times.
Conclusion
So that's it for this tree. I was paging through a fairly new Kokufu album in my collection recently and found this tree on display. It had been awarded "Important Japanese Bonsai Masterpiece" status so we could not have picked a better example to discuss.
I trust my comments were insightful and constructive. My goal for this blog post was to get you thinking critically when viewing a bonsai tree and to understand some of the artistic devices used by true bonsai artists and how you too may utilize the same, deliberately and not by chance.
Remember that like you, I am still very much a student of bonsai ever aspiring to achieve better trees. Whether you agree with my comments or not that's perfectly fine, at least I got you thinking about it and I am sure you also have more aids now from which from to draw when you next design a tree.
You can download this blog post for FREE in PDF format by clicking on this link.
Leave a comment
Comments will be approved before showing up.
