


Orchids


Cork bark elm cuttings the easy way
I recently found myself in good company with Stephen and Rhonel of Stone Lantern at their annual nursery open day. This is the day when Stephen reveals recently dug field grown trees, or as my wife calls them "stumps." Well it is these stumps that see people lining up at the gate in the early hours of the morning!
Stone Lantern is the place to get a great cork barked elm and this year was no exception. I too found a trunk that caught my attention, well ok, more than one.
As with all his field grown trees, Stephen tries to leave as many branches as possible, creating endless options for you to create your tree with. However what to do with the branches you remove?
Cuttings
Good material
Propagating with cuttings can be loads of fun and very rewarding too. Generally speaking, most cutting material is from portions of an overgrown branch which you don't want and are pruning off. Most times this growth lacks in interest. However in the case of these field grown cork bark elms which have been pruned over years, you have a chance of taking some really exciting cuttings which could in a relatively short space of time become great little mame or shohin sized trees.

Image caption. A cutting with an interesting shape taken in early spring once the leaves have already opened quite a bit.
The same opportunity would exist if you have been styling a branch on one of your trees but one day need to remove it. Don't just chop it off, it most likely has loads of character and may make a really nice tree itself. Take note the process might be a little different to what I am about to describe though.
Strike rates
I'm not going to delve into the technicalities of taking cuttings or spell out the pros and cons, however I do need to mention that the degree of success with taking cuttings of the size I will show you will differ depending on species and local climate.
From my own somewhat limited experience and also from what I have seen and been told, sizable cuttings from this species of elm in particular, roots very easily if you are privy to a little secret.
The secret
Most cuttings are cut from the mother or donor plant, dipped in liquid or powder rooting hormone then inserted into suitable medium. With this species of elm the key is to take the cutting and leave it to soak in water until a gel or jelly like substance can be seen at the cut. When this happens you can remove it from the water and gently plant it (trying not to wipe off the gel). The strike rate when employing this technique is very high indeed.

Image caption. After a short while soaking in plain water, in this case, there was plenty of the gel like substance which I assume to be sap.
Movement
One of the most common reasons for cuttings failing is movement. If once roots begin to shoot from the cutting they are subjected to movement they are at great risk of breaking being that they are so brittle. If this happens the chances of the cutting having sufficient reserves to be able to shoot roots again are very low.
So we should consider preventing movement very seriously and take any steps necessary.
Makeshift support
As there are no existing roots on which to anchor, and as I would prefer to avoid a network of wires criss-crossing the tree and container, cable ties or other eyesore creating solutions, I will create an anchor below the cutting with a screw.

Image caption. A pilot hole drilled into the base of the cutting.
To make it easier to insert the screw its a good idea to drill a pilot hole into the wood. Don't worry about the friction and heat this will create, it will not affect the cutting although using a wood drill bit will help to remove the cut material quickly and easily.

Image caption. Carefully inserting the corrosion resistant screw
Using a screw of stainless steel or other material which will not rust is a good idea. The last thing you want is to have the screws head break off due to corrosion after a year when you repot the then rooted cuttings.
Anchor wire
Onto the screw you can carefully coil aluminium or copper wire. The length should be sufficient to pass through the bottom of your intended container. The thickness is up to you but it should be manageable, so not too thick. However the last thing you want is it snapping when you tighten it up, so not too thin.

Image caption. A length of wire is secured to the screw.
I find using annealed copper wire works well as it is stronger than aluminium wire of the same thickness and is more manageable. Its your choice though, try both and see which works best for you.
Container
For these cuttings due to the manner in which I am supporting them, I need to use a rigid container. Usually small plastic pots would suffice but in this case I am using small clay Deroma containers into which I have drilled two additional holes using a masonry bit. These two holes will allow me to pass the two wire ends through for fastening the cutting in place. The original drainage hole is covered, as usual with a piece of drainage mesh to prevent growing media from pouring out the bottom.

Image caption. Small clay Deroma pot with additional holes drilled into the base.
Clay is a great thermal insulator, buffering temperature changes and also absorbing excess moisture from your growing media.

Image caption. Wires inserted through the extra holes, drainage mesh in place.
Rooting medium
I am using the Professional Mix, which is 2-4mm crushed/whole Leca and high quality black/white peat moss. This is a very light medium which will provide great drainage but with sufficient water retention thanks mostly to the peat. However the graded particle sizes ensure that there is excellent oxygen exchange and this is what will accelerate root development.

Image caption. Filling the container with growing medium.
Once your securing wires have been inserted through the base of the container, carefully fill the container with your chosen growing medium.
Gently lower your cutting onto the medium and then from below begin to twist the wires. This will begin to pull the cutting down into the medium, which should give fairly easily at first as it has not been compacted yet. However after a few twists the cutting should be quite firm (test this by pushing the cutting gently from side to side. A little movement is ok, but it should feel firm).
If when you twist the wire, you do so centered to the main drainage hole then when you are done and have cut off any excess wire you will be able to push the joint a little ways into the recess of the drainage hole.

Image caption. With the joint neatly tucked into the drainage hole there is nothing to cause rocking of the container when placed onto a flat surface.
Aftercare
Chopped sphagnum moss is placed around the base of the cuttings. This will encourage surface rooting (Ever noticed that roots generally grow almost straight down into your container?) as the moss stabilizes the soil until roots can take over this function and it also creates a moist top layer preventing the surface roots from drying out and dying. The whole planting is then thoroughly watered with a fine spray wand or watering can.

I will keep these cuttings in an area which is at first in complete but light shade until I see some new growth and will then gradually move them into more and more sunlight. For the first year I will most likely only expose them to morning sun, sheltering them from the hot, dry afternoon sun. Most important though, especially until they are firm in their containers, is to prevent them from being exposed to wind.
Fertilizing
At this time there is little point to fertilizing as there are no roots to take up the nutrients. However later in the season, provided I witness good foliage development I will foliar feed alternating between Seagro and Sea Secret. To both I will add a bit of Kelpak as this contains auxins which stimulate root development. In autumn I would consider using a solid, organic fertilizer in addition to the above to help prepare them for the following spring, something like Bonsai Boost.

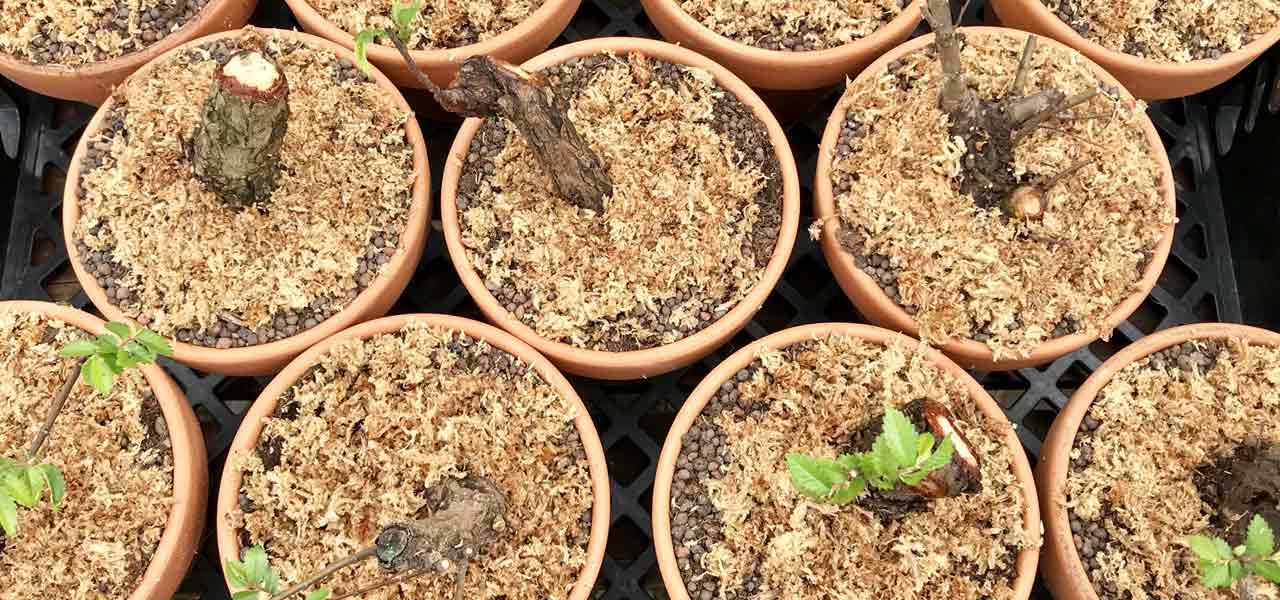
Image caption. From this original trunk I purchased, I was able to take 10 really great cuttings.
Additional Note. When repotting these trees you can also use any roots you cut to create new trees. Root cuttings from all elms I am aware of root very easily.
Leave a comment
Comments will be approved before showing up.
